crwdns2933423:0crwdne2933423:0

Microsoft Surface 3 ディスプレイの交換

crwdns2935425:01crwdne2935425:0

crwdns2936315:0crwdne2936315:0
crwdns2936323:0crwdne2936323:0
crwdns2931653:01crwdne2931653:0
Microsoft Surface 3 Display Replacement: crwdns2935265:00crwdnd2935265:01crwdnd2935265:03crwdne2935265:0 Microsoft Surface 3 Display Replacement: crwdns2935265:00crwdnd2935265:02crwdnd2935265:03crwdne2935265:0 Microsoft Surface 3 Display Replacement: crwdns2935265:00crwdnd2935265:03crwdnd2935265:03crwdne2935265:0
  • The RF shield that you are about to remove will be damaged in the process. you may be able to bend it back into shape once you remove it.

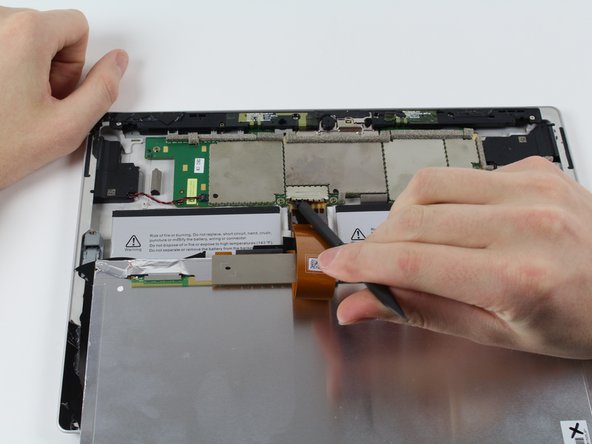
  • Locate the point where the display is still attached to the motherboard.

  • Use a flat spudger to pry off the RF shielding/bracket retainer.

  • Use a thin guitar pick to release the snap pin from the display to the motherboard.

  • The little black piece (the latch for the ZIF connector) that you have just flipped up is no longer held in place by anything due to Microsoft trying to make the device slimmer. It will fall out and be lost for all eternity unless you carefully keep track of it.

これから取り外すRFシールドは、作業中に損傷を受けてしまいます。 しかし取り外した後、形を整えて元の形状に戻すことができる場合があります。

マザーボードに繋がっているディスプレイの接続場所を確認します。

スパッジャーを使って、RFシールドとブラケットのリテイナーを外します。

薄い開口ピックを使って、ディスプレイからマザーボードに繋がっているスナップピンを外します。

裏返したばかりの小さな黒いパーツ−ZIFコネクタのラッチは、外れている状態です(固定されていません)。 それを注意深く保管しない限り、ラッチは脱落し紛失してしまいます。

crwdns2944171:0crwdnd2944171:0crwdnd2944171:0crwdnd2944171:0crwdne2944171:0