crwdns2933423:0crwdne2933423:0

iPod Touch 4th Generation 30 Pin Dock Connector Replacement

crwdns2936315:0crwdne2936315:0
crwdns2936321:0crwdne2936321:0
crwdns2931653:016crwdne2931653:0
iPod Touch 4th Generation 30 Pin Dock Connector Replacement: crwdns2935265:00crwdnd2935265:01crwdnd2935265:03crwdne2935265:0 iPod Touch 4th Generation 30 Pin Dock Connector Replacement: crwdns2935265:00crwdnd2935265:02crwdnd2935265:03crwdne2935265:0 iPod Touch 4th Generation 30 Pin Dock Connector Replacement: crwdns2935265:00crwdnd2935265:03crwdnd2935265:03crwdne2935265:0
  • Lightly heat the areas in red with your heat gun to soften the adhesive underneath the logic board.

  • Don’t heat this area too much, excessive heat will fry the speaker.

  • Once heated, gently pry the logic board up with a cell phone opening tool.

  • Make sure to angle the cell phone opening tool under the red speaker wire located at the bottom left of the device before prying upwards.

  • Lift the bottom of the logic board out of the casing with your fingers.

  • The front facing camera may still be attached by adhesive. Using a metal spudger, gently pry the front facing camera from the casing.

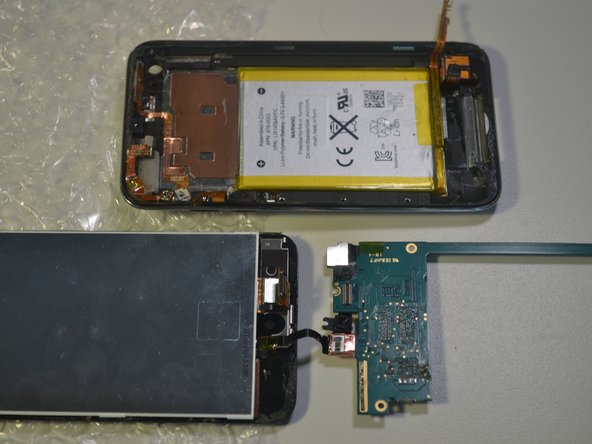
  • Remove the logic board from the steel casing.

crwdns2935429:0crwdne2935429:0

crwdns2935429:0crwdne2935429:0

crwdns2935429:0crwdne2935429:0

crwdns2935429:0crwdne2935429:0

crwdns2935429:0crwdne2935429:0

crwdns2935429:0crwdne2935429:0

crwdns2935429:0crwdne2935429:0

crwdns2944171:0crwdnd2944171:0crwdnd2944171:0crwdnd2944171:0crwdne2944171:0