crwdns2933423:0crwdne2933423:0

Kindle Fire HD ディスプレイアセンブリ(フロントガラスとLCD)の交換

crwdns2936315:0crwdne2936315:0
crwdns2936323:0crwdne2936323:0
crwdns2931653:03crwdne2931653:0
Kindle Fire HD Display Assembly (Front Glass and LCD) Replacement, Remove battery: crwdns2935265:00crwdnd2935265:01crwdnd2935265:03crwdne2935265:0 Kindle Fire HD Display Assembly (Front Glass and LCD) Replacement, Remove battery: crwdns2935265:00crwdnd2935265:02crwdnd2935265:03crwdne2935265:0 Kindle Fire HD Display Assembly (Front Glass and LCD) Replacement, Remove battery: crwdns2935265:00crwdnd2935265:03crwdnd2935265:03crwdne2935265:0
Remove battery
  • Tip: keep track of all your screws so reassembly will be simple and easy. One easy method is to take a small piece of tape, stick the head of each screw (in that step) to the tape, and then attach a scrap of paper (with the name/location written on it) to the tape.

  • Remove four Phillips #00 screws and one T5 Torx screw which secure the battery in place.

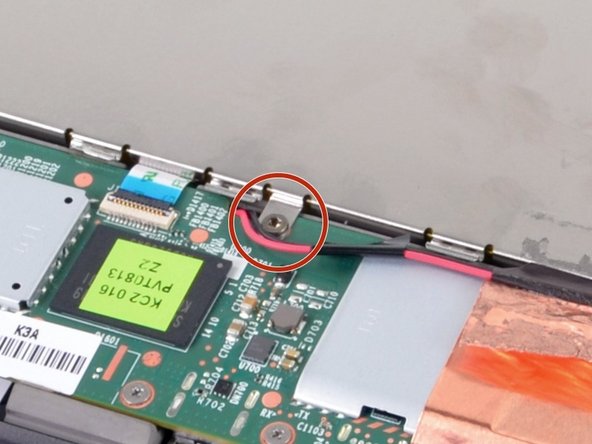
  • The T5 Torx screw is located on the motherboard near the antenna clip. Remove it using a special T5 Torx screwdriver.

  • If you aren't equipped with the T5 Torx screwdriver, you could try using your fingers, but it will be very difficult to remove it.

  • To remove battery, lift battery up and away from Kindle, and pull cable out of motherboard.

ヒント:再組み立てが簡単に進むように、全ての外したネジの装着場所をメモ書きしてください。 簡単な方法の1つは、小さなテープを、各ネジの頭をテープに貼り付け、名前/位置を記入します。その紙のスクラップをテープに貼り付けます。

バッテリーを固定している、4本の#00ネジとT5トルクスネジを外します。

T5トルクスネジはアンテナクリップ付近のマザーボード上に付いています。特殊T5トルクスドライバーを使って外します。

T5トルクスドライバーを持ち合わせていない場合は、指先を使ってみてください。しかし外すのは非常に困難です。

バッテリーを取り出すには、バッテリーを持ち上げてKindle本体から外します。マザーボードからケーブルを引き離します。

crwdns2944171:0crwdnd2944171:0crwdnd2944171:0crwdnd2944171:0crwdne2944171:0