crwdns2933423:0crwdne2933423:0

Kindle Fire HD ディスプレイアセンブリ(フロントガラスとLCD)の交換

crwdns2935425:01crwdne2935425:0

crwdns2936315:0crwdne2936315:0
crwdns2936323:0crwdne2936323:0
crwdns2931653:01crwdne2931653:0
Kindle Fire HD Display Assembly (Front Glass and LCD) Replacement, Open the Kindle: crwdns2935265:00crwdnd2935265:01crwdnd2935265:03crwdne2935265:0 Kindle Fire HD Display Assembly (Front Glass and LCD) Replacement, Open the Kindle: crwdns2935265:00crwdnd2935265:02crwdnd2935265:03crwdne2935265:0 Kindle Fire HD Display Assembly (Front Glass and LCD) Replacement, Open the Kindle: crwdns2935265:00crwdnd2935265:03crwdnd2935265:03crwdne2935265:0
Open the Kindle
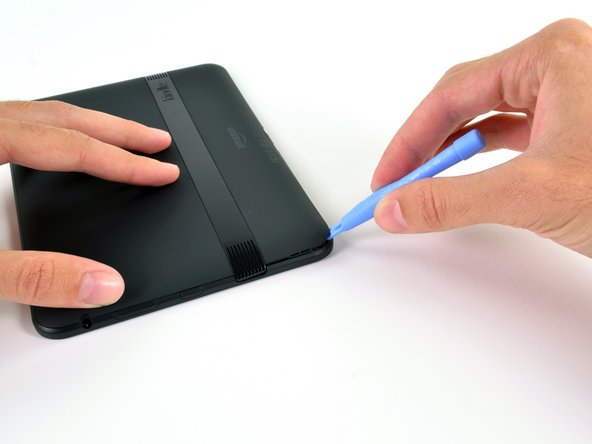
  • Wedge a plastic opening tool into the lower right corner of the Kindle Fire.

  • Pry the case apart and run the plastic opening tool along the perimeter of the Kindle Fire to release the clips securing the case halves to each other.

  • If you are having difficulty inserting the plastic opening tool, carefully use a metal spudger (or a small flathead screwdriver) to undo the first clip, then switch back to the opening tool to avoid scratching your case.

  • The case is held on by clips along the perimeter of the bottom half of the Kindle. Zoom into the image to see where these clips are located.

プラスチックの開口ツールをKindle Fireの右下コーナーに差し込みます。

プラスチックの開口ツールをKindle Fireの周辺に沿ってスライドしながら、ケースに留められたクリップを外していきます。

プラスチックの開口ツールが上手く挿入できない場合は、メタル製スパッジャーを使って(もしくは小サイズのマイナスドライバー) で最初のクリップを外します。それから開口ツールに持ち替えて、ケースに傷をつけないように注意しながら残りのクリップを外してください。

ケースはクリップでKindleの下側半分周辺に沿って留められています。これらのクリップが付いている場所をズームして確認してください。

crwdns2944171:0crwdnd2944171:0crwdnd2944171:0crwdnd2944171:0crwdne2944171:0