crwdns2933423:0crwdne2933423:0

Démontage de l'ensemble capteur du Olympus E-Pl1

crwdns2931529:0crwdnd2931529:0crwdnd2931529:0crwdnd2931529:02crwdnd2931529:0crwdne2931529:0

crwdns2936315:0crwdne2936315:0
crwdns2936317:0crwdne2936317:0
crwdns2931653:07crwdne2931653:0
Olympus E-Pl1 Sensor Assembly Removal: crwdns2935265:00crwdnd2935265:01crwdnd2935265:03crwdne2935265:0 Olympus E-Pl1 Sensor Assembly Removal: crwdns2935265:00crwdnd2935265:02crwdnd2935265:03crwdne2935265:0 Olympus E-Pl1 Sensor Assembly Removal: crwdns2935265:00crwdnd2935265:03crwdnd2935265:03crwdne2935265:0
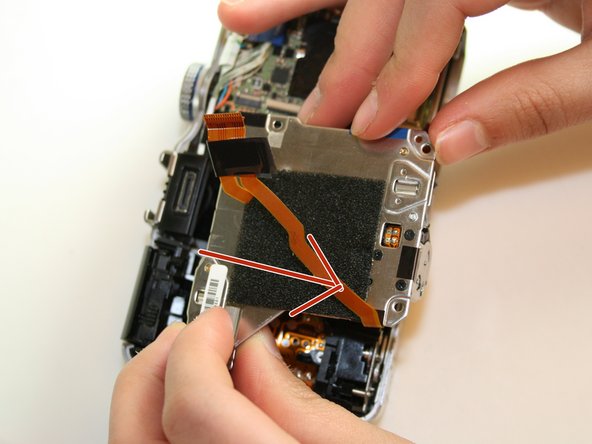
  • Now you can lift out the sensor assembly. The following steps will explain how to lift it out.

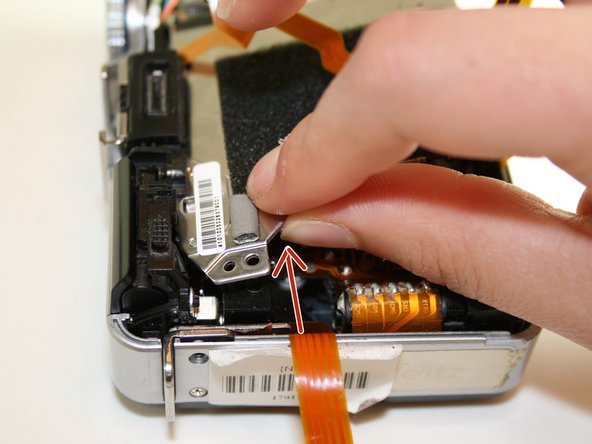
  • First, sightly lift the bottom half following the direction of the arrow.

  • Second, lift the top left up side up. It may be a little stuck so you will have to wiggle it out.

  • Finally, pull the entire assembly towards the bottom and away from the case.

  • There is a ribbon connector that is beneath the assembly. Be careful when lifting the assembly out. Do not yank it out very hard or you may damage the ribbon connector.

Vous pouvez maintenant soulever l'assemblage du capteur. Les étapes suivantes expliquent comment le soulever.

Tout d'abord, soulevez légèrement la moitié inférieure en suivant la direction de la flèche.

Deuxièmement, soulevez la partie supérieure gauche vers le haut. Il est peut-être un peu coincé, vous devrez donc le faire disparaître.

Enfin, tirez l'ensemble vers le bas et loin du boîtier.

Il y a un connecteur ruban qui se trouve sous l'assemblage. Soyez prudent lorsque vous soulevez l'assemblage. Ne le tirez pas trop fort ou vous pourriez endommager le connecteur ruban.

crwdns2944171:0crwdnd2944171:0crwdnd2944171:0crwdnd2944171:0crwdne2944171:0