crwdns2933423:0crwdne2933423:0

사진 후-처리하는 방법

crwdns2936315:0crwdne2936315:0
crwdns2936325:0crwdne2936325:0
crwdns2931653:04crwdne2931653:0
How to Post-Process Pictures: crwdns2935265:00crwdnd2935265:01crwdnd2935265:02crwdne2935265:0 How to Post-Process Pictures: crwdns2935265:00crwdnd2935265:02crwdnd2935265:02crwdne2935265:0
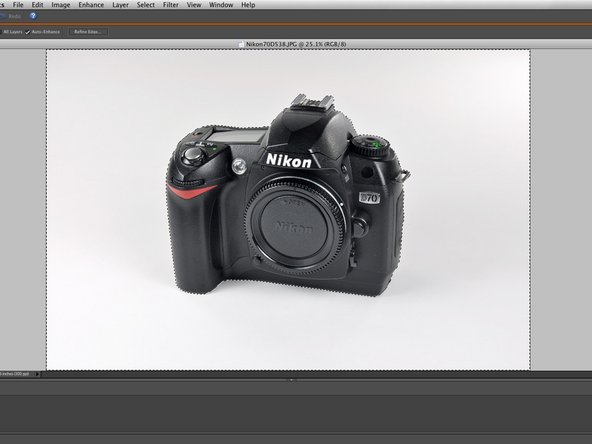
  • Editing the entire picture will not always achieve the desired results. For example, the background in this picture is dark and contains undesired colors so we will select everything but the camera.

  • Selecting specific spots will allow you to eliminate particular issues and edit a picture to perfection.

  • Some automatic selection tools will create a "marquee" that is very close, too close to the object. Look for a command like Select, Modify, Shrink to reduce the proximity to your object by 1, 2, 3, or 4 pixels. This will leave a small buffer around your object so that your edits don't effect the object as well.

전체 사진을 편집해도 항상 원하는 결과를 얻을 수는 없습니다. 예를 들어, 이 사진의 배경이 어둡고 원하지 않는 색상을 포함하므로 우리는 카메라를 제외한 모든 것을 선택합니다.

구체적인 부분을 선택하면 특정 문제를 해결하여 사진을 적절하게 편집 할 수 있습니다.

일부 자동 선택 기능은 물체에 너무 가까이 "marquee/마키"를 만듭니다. Select, Modify, Shrink/선택, 수정, 줄이기와 같은 명령을 사용하여 물체 근접 거리를 1, 2, 3 또는 4픽셀로 줄이세요. 이렇게 하면 물체 주위에 작은 버퍼가 생겨 편집 사항들은 물체에 영향을 미치지 않습니다.

crwdns2944171:0crwdnd2944171:0crwdnd2944171:0crwdnd2944171:0crwdne2944171:0