crwdns2933423:0crwdne2933423:0

MacBook Pro (13英寸,配备Retina显示屏,2015初期)拆解

crwdns2936315:0crwdne2936315:0
crwdns2936311:0crwdne2936311:0
crwdns2931653:015crwdne2931653:0
MacBook Pro 13" Retina Display Early 2015 Teardown: crwdns2935265:00crwdnd2935265:01crwdnd2935265:03crwdne2935265:0 MacBook Pro 13" Retina Display Early 2015 Teardown: crwdns2935265:00crwdnd2935265:02crwdnd2935265:03crwdne2935265:0 MacBook Pro 13" Retina Display Early 2015 Teardown: crwdns2935265:00crwdnd2935265:03crwdnd2935265:03crwdne2935265:0
  • Removing the trackpad from the bracket requires slicing through four pads of glue.

  • With the pad splayed open, we get our first look at the pressure sensors.

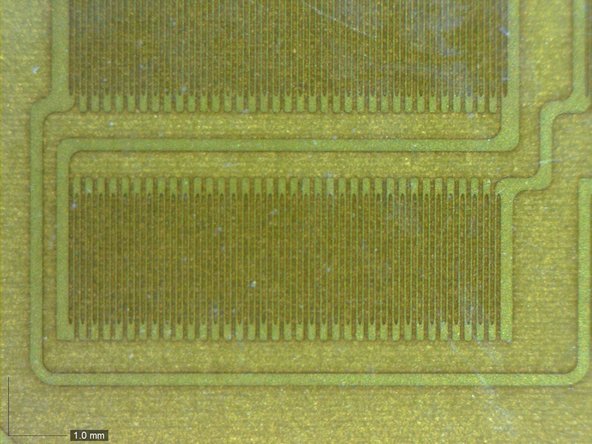
  • And popping the sensor bracket under a microscope, we get a second, closer look.

  • Based on the wiggly pattern of traces stuck to the metal tabs, we're pretty sure the magic pressure sensors in the new Force Touch trackpad are tiny strain gauges. Mounted on flexing metal supports, they detect the amount of flex on each—and based on that, the force from above.

  • This works in conjunction with the traditional capacitive touchpad up top, to pinpoint where you're applying force.

  • Be sure to check out our in-depth video analysis of the Force Touch trackpad!

从支架上移除触控板需要切割四个胶板。

随着触控板的打开,我们第一次看到压力传感器。

在显微镜下取出传感器支架,我们会得到第二个,更近的观察。

基于粘在金属标签上的轨迹,我们很确定新款Force Touch触控板上的神奇压力传感器是微小的应变仪。他们被安装在弯曲的金属支架上,检测在each上的flex的数量,基于上面的力。

这与传统的电容式触摸板连接在一起,以确定你在哪里施加压力。

一定要查看我们对Force Touch触摸板的深度视频分析!

crwdns2944171:0crwdnd2944171:0crwdnd2944171:0crwdnd2944171:0crwdne2944171:0