crwdns2933423:0crwdne2933423:0

MacBook Pro 13" Retina Display Early 2015 분해도

crwdns2936315:0crwdne2936315:0
crwdns2936325:0crwdne2936325:0
crwdns2931653:015crwdne2931653:0
MacBook Pro 13" Retina Display Early 2015 Teardown: crwdns2935265:00crwdnd2935265:01crwdnd2935265:03crwdne2935265:0 MacBook Pro 13" Retina Display Early 2015 Teardown: crwdns2935265:00crwdnd2935265:02crwdnd2935265:03crwdne2935265:0 MacBook Pro 13" Retina Display Early 2015 Teardown: crwdns2935265:00crwdnd2935265:03crwdnd2935265:03crwdne2935265:0
  • Removing the trackpad from the bracket requires slicing through four pads of glue.

  • With the pad splayed open, we get our first look at the pressure sensors.

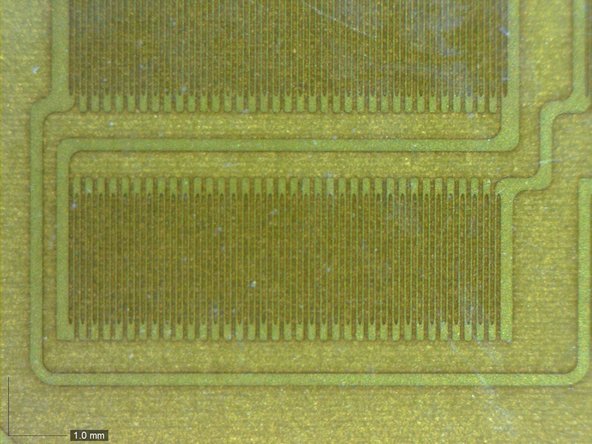
  • And popping the sensor bracket under a microscope, we get a second, closer look.

  • Based on the wiggly pattern of traces stuck to the metal tabs, we're pretty sure the magic pressure sensors in the new Force Touch trackpad are tiny strain gauges. Mounted on flexing metal supports, they detect the amount of flex on each—and based on that, the force from above.

  • This works in conjunction with the traditional capacitive touchpad up top, to pinpoint where you're applying force.

  • Be sure to check out our in-depth video analysis of the Force Touch trackpad!

브래킷에서 트랙패드를 분리하려면 접착 패드를 네 개를 잘라야 합니다.

패드를 열어 놓고 우리는 처음으로 압력 센서를 자세히 살펴봅니다.

또한 센서 브래킷을 현미경 아래에 놓고 우리는, 두 번째로, 자세히 살펴봅니다.

금속 탭에 붙어있는 꾸불꾸불한 모양을 근거로, 우리는 작은 strain gauges/스트레인 게이지가 새로운 Force Touch 트랙패드의 마법 압력 센서라고 확신합니다. 그들은 금속 지지대에 위치하며—그에 근거하여 위에서 오는 힘, 각 힘의 양을 감지합니다.

이는 상단의 기존의 정전식 터치패드와 함께 작동하여 힘이 가해지는 정확한 위치를 짚어줍니다.

자사의 Force Touch 트랙패드 심층 비디오 분석을 확인하세요!

crwdns2944171:0crwdnd2944171:0crwdnd2944171:0crwdnd2944171:0crwdne2944171:0