crwdns2933423:0crwdne2933423:0

iPod Touch 4th Generation Front Panel Replacement

crwdns2931529:0crwdnd2931529:0crwdnd2931529:0crwdnd2931529:08crwdnd2931529:0crwdne2931529:0

crwdns2936315:0crwdne2936315:0
crwdns2936325:0crwdne2936325:0
crwdns2931653:07crwdne2931653:0
iPod Touch 4th Generation Front Panel Replacement: crwdns2935265:00crwdnd2935265:01crwdnd2935265:03crwdne2935265:0 iPod Touch 4th Generation Front Panel Replacement: crwdns2935265:00crwdnd2935265:02crwdnd2935265:03crwdne2935265:0 iPod Touch 4th Generation Front Panel Replacement: crwdns2935265:00crwdnd2935265:03crwdnd2935265:03crwdne2935265:0
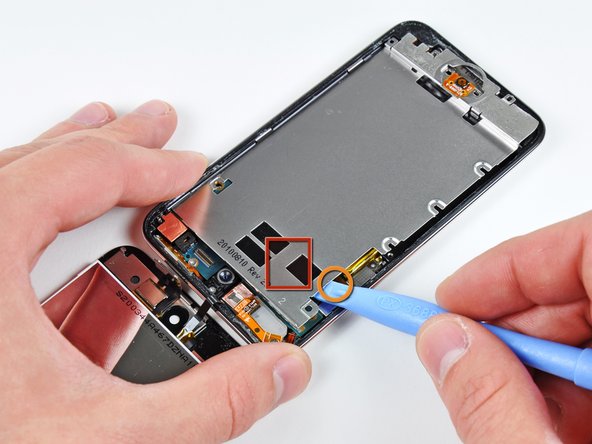
  • Insert the edge of an opening tool under the steel mid plate near the bottom left corner of the Touch.

  • Slowly pry upward to separate the plate from the adhesive securing it to the plastic inner case.

  • If the plate is still attached to the logic board, re-warm the area to loosen the adhesive, then slowly separate the plate from the logic board using the opening tool.

  • There is a thin, fragile ribbon cable underneath the plate. As you pry the plate up, be very careful not to rip the cable.

  • This cable may stick to the plate and will tear very easily if you're not careful. Work slowly and be careful not to strain the cable.

crwdns2935429:0crwdne2935429:0

crwdns2935429:0crwdne2935429:0

crwdns2935429:0crwdne2935429:0

crwdns2935429:0crwdne2935429:0

crwdns2935429:0crwdne2935429:0

crwdns2944171:0crwdnd2944171:0crwdnd2944171:0crwdnd2944171:0crwdne2944171:0