crwdns2933423:0crwdne2933423:0

T-Mobile 3.1AMP Micro USB-autolader demontage

crwdns2936315:0crwdne2936315:0
crwdns2936313:0crwdne2936313:0
crwdns2931653:03crwdne2931653:0
T-Mobile 3.1AMP Micro USB Car Charger Teardown: crwdns2935265:00crwdnd2935265:01crwdnd2935265:02crwdne2935265:0 T-Mobile 3.1AMP Micro USB Car Charger Teardown: crwdns2935265:00crwdnd2935265:02crwdnd2935265:02crwdne2935265:0
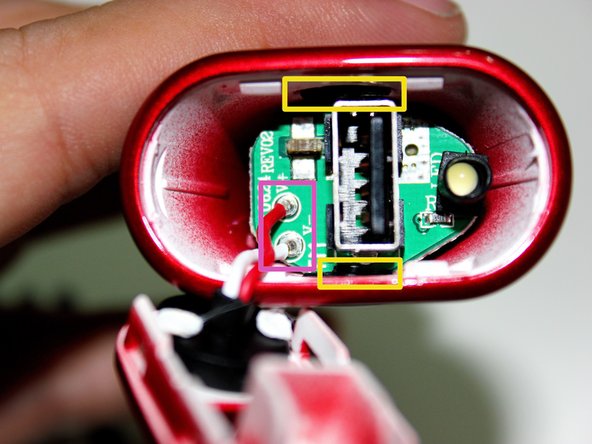
  • With the lid removed, we can now see a bit of the circuitry including:

  • USB port

  • LED light

  • a lone resistor

  • Separating the top cover from the bottom cover takes two steps:

  • There are two wires connecting the curly cord to the charger, so we need to cut these wires with the flush wire cutters to keep them neat and reusable.

  • Next we can see that there are two tabs keeping the red plastic cover connected to the black plastic cover. In order to separate these two we need to use two plastic opening tools in tandem with a little bit of force. As stated earlier, T-Mobile did not design these chargers to be easily repaired.

Met het deksel verwijderd, kunnen we nu een deel van het circuit zien, waaronder:

USB poort

LED verlichting

Een eenzame weerstand

Het scheiden van de bovenkant van de onderkant gaat in twee stappen:

Er zijn twee draden die het krulsnoer met de oplader verbinden, dus we moeten deze draden doorknippen met de kniptang om ze netjes en herbruikbaar te houden.

Vervolgens kunnen we zien dat er twee lipjes zijn die de rode plastic kap verbonden houden met de zwarte plastic kap. Om deze twee te scheiden, moeten we met een beetje kracht twee plastic openingsgereedschappen gebruiken. Zoals eerder vermeld, heeft T-Mobile deze opladers niet ontworpen om gemakkelijk te repareren.

crwdns2944171:0crwdnd2944171:0crwdnd2944171:0crwdnd2944171:0crwdne2944171:0