crwdns2933423:0crwdne2933423:0

Mise à la terre d'un établi

crwdns2936315:0crwdne2936315:0
crwdns2936317:0crwdne2936317:0
crwdns2931653:03crwdne2931653:0
Desk Grounding A Work Bench, Preparation of Wires and Fittings: crwdns2935265:00crwdnd2935265:01crwdnd2935265:03crwdne2935265:0 Desk Grounding A Work Bench, Preparation of Wires and Fittings: crwdns2935265:00crwdnd2935265:02crwdnd2935265:03crwdne2935265:0 Desk Grounding A Work Bench, Preparation of Wires and Fittings: crwdns2935265:00crwdnd2935265:03crwdnd2935265:03crwdne2935265:0
Preparation of Wires and Fittings
  • Cut a 30 cm long cord (for a table).

  • Cut cable 1.3 m long cable (shelves).

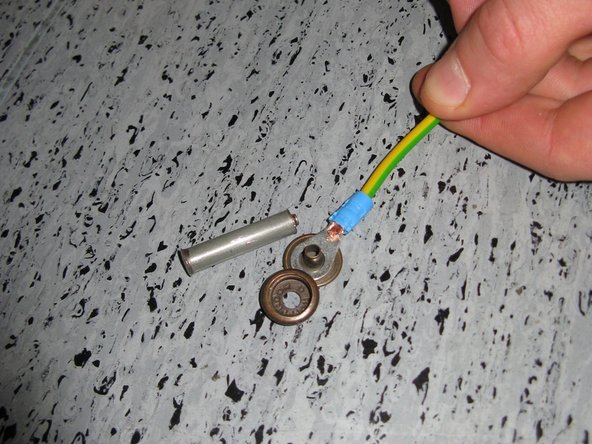
  • The wire is insulated at both ends. Setting the insulation pliers at the 10 mm mark.

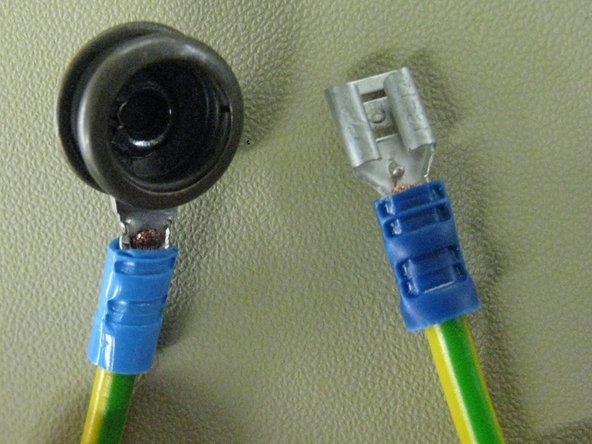
  • A quick-connect contact is clamped to one end of the cord.

  • The loop contact is pressed onto the other end and a pin with a hammer is hammered onto it.

  • Only the red pliers mark is used to clamp the contact.

  • Check with your fingers that the head clip does not rotate around its axis. If it rotates, the clamp must be replaced with a new one.

  • For both wires, one end is terminated with a quick-connect contact, the other end with a pin with a head.

Coupez un fil de 30 cm de long (pour l'établi).

Coupez un fil de 1,3 m de long (pour l'étagère).

Le fil doit être isolé aux deux extrémités. Réglez la pince à dénuder sur le repère de 10 mm.

Sertissez une cosse clip femelle à une extrémité.

À l'autre extrémité, sertissez le plot pour l'œillet.

Seule la marque rouge de la pince est utilisée pour sertir les deux dispositifs.

Vérifiez avec vos doigts que la cosse ne tourne pas sur son axe. Si c'est le cas, elle doit être remplacée.

Pour les deux fils, une extrémité est terminée par une cosse clip femelle et l'autre extrémité par le plot pour l'œillet.

crwdns2944171:0crwdnd2944171:0crwdnd2944171:0crwdnd2944171:0crwdne2944171:0