crwdns2933423:0crwdne2933423:0

iPhone 4 のリアカメラの交換

crwdns2936315:0crwdne2936315:0
crwdns2936323:0crwdne2936323:0
crwdns2931653:02crwdne2931653:0
iPhone 4 Rear Camera Replacement: crwdns2935265:00crwdnd2935265:01crwdnd2935265:03crwdne2935265:0 iPhone 4 Rear Camera Replacement: crwdns2935265:00crwdnd2935265:02crwdnd2935265:03crwdne2935265:0 iPhone 4 Rear Camera Replacement: crwdns2935265:00crwdnd2935265:03crwdnd2935265:03crwdne2935265:0
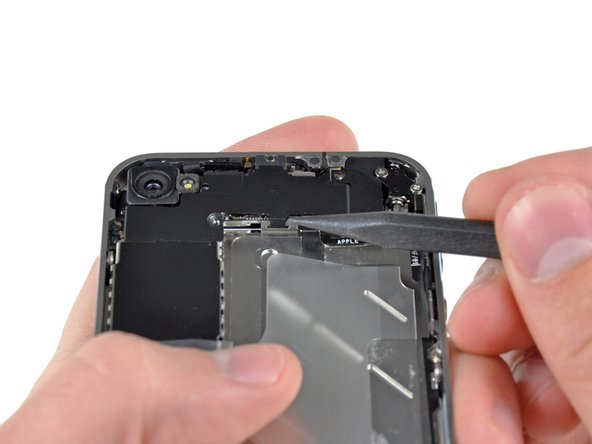
  • Use an iPod opening tool to slightly lift the top edge of the connector cover away from the logic board.

  • Use the tip of a spudger to pull the connector cover retaining clips away from the inner frame.

  • Remove the connector cover from the iPhone.

  • Before reassembly, be sure to clean all metal-to-metal contact points on the connector cover with a de-greaser such as windex. The oils on your fingers have the potential to cause wireless interference issues.

  • There is a tiny metal part on the top screw hole, make sure this stays on. It's a key part of the wireless and GPS antenna.

iPod用の開口ツールを使って、基盤からコネクターカバーの上部先端を持ち上げて接続を外します。

スパッジャーの先端を使って、内部フレームからコネクターカバーの固定クリップを外します。

iPhoneからコネクターカバーを取り出します。

再組み立ての前に、コネクターカバー上のメタル間の接合ポイントを窓拭きガラス用スプレーなどの油とりスプレーで綺麗に拭き取ってください。油脂は電波障害の原因となることがあります。

上部のスクリューホール上に小さなメタル製パーツがあります。このパーツが正しい位置にあることを確認してください。これはワイヤレスやGPSアンテナの重要な役割を担っています。

crwdns2944171:0crwdnd2944171:0crwdnd2944171:0crwdnd2944171:0crwdne2944171:0