crwdns2933423:0crwdne2933423:0

Remplacement du haut-parleur du Samsung Galaxy Note 10.1

crwdns2936315:0crwdne2936315:0
crwdns2936317:0crwdne2936317:0
crwdns2931653:05crwdne2931653:0
Samsung Galaxy Note 10.1 Speaker Replacement, Removing the Components Around the Motherboard: crwdns2935265:00crwdnd2935265:01crwdnd2935265:03crwdne2935265:0 Samsung Galaxy Note 10.1 Speaker Replacement, Removing the Components Around the Motherboard: crwdns2935265:00crwdnd2935265:02crwdnd2935265:03crwdne2935265:0 Samsung Galaxy Note 10.1 Speaker Replacement, Removing the Components Around the Motherboard: crwdns2935265:00crwdnd2935265:03crwdnd2935265:03crwdne2935265:0
Removing the Components Around the Motherboard
  • From the first photo:

  • Remove all the components marked by yellow circles

  • Unscrew all the 2 and 3 mm screws marked by the red circles with the #00 Philips screwdriver.

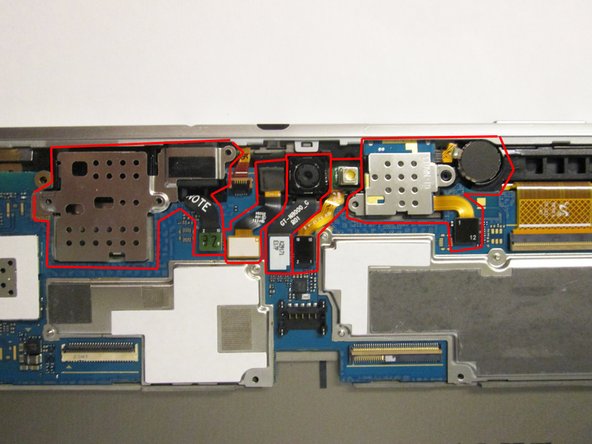
  • From the second photo:

  • Starting with the motherboard connectors, remove all the components marked in red.

  • Please place all components removed after this point in a static-free area or in anti-static bags.

  • Please note that you can only remove the ribbon attached to the headphone jack and the metal covering it on the far left. Do not attempt to remove the whole piece at this time.

De la première photo:

Supprimer tous les composants marqués par des cercles jaunes

Dévissez toutes les vis de 2 et 3 mm marquées par les cercles rouges avec le tournevis Philips # 00.

De la seconde photo:

En commençant par les connecteurs de la carte mère, retirez tous les composants marqués en rouge.

Veuillez placer tous les composants retirés après ce point dans une zone antistatique ou dans des sacs antistatiques.

Veuillez noter que vous ne pouvez retirer que le ruban attaché à la prise casque et le métal qui le recouvre à l'extrême gauche. N'essayez pas de retirer la pièce entière à ce moment.

crwdns2944171:0crwdnd2944171:0crwdnd2944171:0crwdnd2944171:0crwdne2944171:0