crwdns2933423:0crwdne2933423:0

Remplacement de la carte mère du HTC One X

crwdns2931529:0crwdnd2931529:0crwdnd2931529:0crwdnd2931529:04crwdnd2931529:0crwdne2931529:0

crwdns2936315:0crwdne2936315:0
crwdns2936317:0crwdne2936317:0
crwdns2931653:03crwdne2931653:0
HTC One X Motherboard Replacement, Remove the top plastic panel: crwdns2935265:00crwdnd2935265:01crwdnd2935265:02crwdne2935265:0 HTC One X Motherboard Replacement, Remove the top plastic panel: crwdns2935265:00crwdnd2935265:02crwdnd2935265:02crwdne2935265:0
Remove the top plastic panel
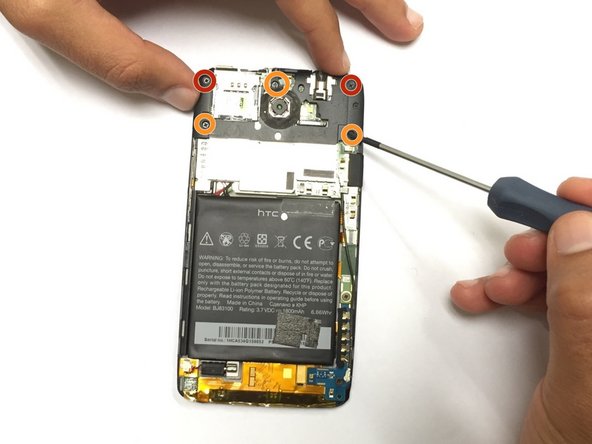
  • Remove the five screws at the top of the panel using a Phillips head screwdriver.

  • Two 2.05mm Philips head screws

  • Three 2.44mm Philips head screws

  • Also remove the screws with the warranty stickers.

  • Once the screws are removed, gently remove the plastic cover using a plastic opening tool to detach the edges from the front panel.

  • Once you have disassembled your device, your warranty will no longer be valid.

Retirez les cinq vis en haut du panneau à l'aide d'un tournevis cruciforme.

Deux vis cruciformes de 2,05 mm

Trois vis cruciformes de 2,44 mm

Retirez également les vis avec les autocollants de garantie.

Une fois les vis retirées, retirez délicatement le couvercle en plastique à l'aide d'un outil d'ouverture en plastique pour détacher les bords du panneau avant.

Une fois que vous aurez démonté votre appareil, votre garantie ne sera plus valable.

crwdns2944171:0crwdnd2944171:0crwdnd2944171:0crwdnd2944171:0crwdne2944171:0