crwdns2933423:0crwdne2933423:0

Démontage du boîtier du moteur Eureka 1660SP

crwdns2931529:0crwdnd2931529:0crwdnd2931529:0crwdnd2931529:03crwdnd2931529:0crwdne2931529:0

crwdns2935425:03crwdne2935425:0

crwdns2936315:0crwdne2936315:0
crwdns2936317:0crwdne2936317:0
crwdns2931653:03crwdne2931653:0
Disassembling Eureka 1660SP Motor Housing: crwdns2935265:00crwdnd2935265:01crwdnd2935265:03crwdne2935265:0 Disassembling Eureka 1660SP Motor Housing: crwdns2935265:00crwdnd2935265:02crwdnd2935265:03crwdne2935265:0 Disassembling Eureka 1660SP Motor Housing: crwdns2935265:00crwdnd2935265:03crwdnd2935265:03crwdne2935265:0
  • Use a #2 Phillips head screwdriver to remove six 13.9mm screws from the side of the motor housing (top half) as shown.

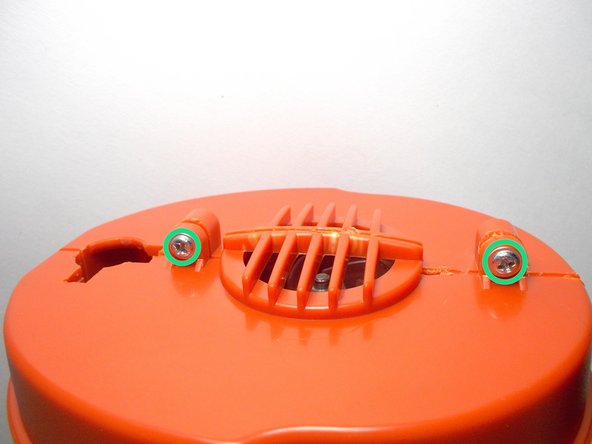
  • Remove two 14.1mm screws from the front face of the housing. You are now all set to open the housing.

  • Keep a watchful eye on the two screws from the front face. These two have additional collars to their necks and will not fit in any of the other holes, yet no other screw will fit in their spots without the collar.

Utilisez un tournevis cruciforme n° 2 pour retirer les six vis de 13,9 mm du côté du boîtier du moteur (moitié supérieure), comme illustré.

Retirez les deux vis de 14,1 mm de la face avant du boîtier. Vous êtes maintenant prêt à ouvrir le boîtier.

Gardez un œil attentif sur les deux vis de la face avant. Ces deux ont des colliers supplémentaires à leur cou et ne rentrent dans aucun des autres trous, mais aucune autre vis ne rentre dans leurs emplacements sans le collier.

crwdns2944171:0crwdnd2944171:0crwdnd2944171:0crwdnd2944171:0crwdne2944171:0