crwdns2933423:0crwdne2933423:0

Teclado de repuesto para MacBook Pro 13" Unibody Mid 2012

crwdns2936315:0crwdne2936315:0
crwdns2936331:0crwdne2936331:0
crwdns2931653:02crwdne2931653:0
MacBook Pro 13" Unibody Mid 2012 Keyboard Replacement, Removing the backlight: crwdns2935265:00crwdnd2935265:01crwdnd2935265:03crwdne2935265:0 MacBook Pro 13" Unibody Mid 2012 Keyboard Replacement, Removing the backlight: crwdns2935265:00crwdnd2935265:02crwdnd2935265:03crwdne2935265:0 MacBook Pro 13" Unibody Mid 2012 Keyboard Replacement, Removing the backlight: crwdns2935265:00crwdnd2935265:03crwdnd2935265:03crwdne2935265:0
Removing the backlight
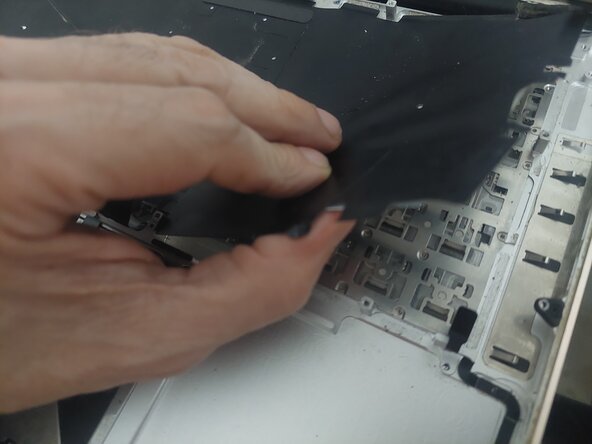
  • We have to remove the backlight carefully as not to damage it, if you are replacing this component then you can simply pull it off.

  • The backlight consists of 3 layers, the very fragile backlight covering, a clear plastic layer and a very fragile keyboard layout template. We DO NOT want to damage these in any way if we are to use them again, so ultimate care is needed. They are stuck together but with plenty of care they can be separated.

  • Using a sharp small craft knife or similar, very carefully lift up the surrounding edge of the backlight by running the blade underneath where the adhesive is located, as we do not want to tear this extremely fragile component.

  • Some may suggest to use a heat gun to soften any adhesive but this will more than likely deform the backlight from the heat, rendering it useless.

  • Once we have a fair sized area lifted we can very gently pull away the backlight using extra care not to tear it. We can use the strength of the middle plastic sheet to assist in lifting it away. Once removed put it to the side as it will be used again in a later stage.

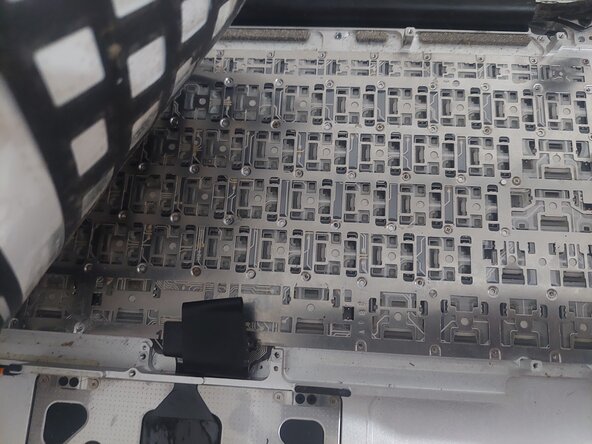
  • We can gently brush or wipe off any stains or debris that may have built up over time using a soft brush or cloth with some alcohol making the part nice and clean ready for re-installation.

Tenemos que quitar la luz de fondo con cuidado para no dañarlo, si va a reemplazar este componente, entonces usted puede simplemente tirar de ella.

La luz de fondo se compone de 3 capas, la cubierta de luz de fondo muy frágil, una capa de plástico transparente y una plantilla de diseño de teclado muy frágil. No queremos dañar estos de ninguna manera si vamos a utilizar de nuevo, por lo que el cuidado final es necesario. Están pegadas, pero con mucho cuidado se pueden separar.

Con un pequeño cuchillo afilado o similar, levante con mucho cuidado el borde circundante de la retroiluminación pasando la hoja por debajo de donde se encuentra el adhesivo, ya que no queremos romper este componente extremadamente frágil.

Algunos pueden sugerir el uso de una pistola de calor para ablandar cualquier adhesivo, pero es más que probable que esto deforme la luz de fondo por el calor, haciéndola inútil.

Una vez que hayamos levantado un área considerable, podemos retirar la luz de fondo con mucho cuidado para no romperla. Podemos utilizar la fuerza de la lámina de plástico del medio para ayudar a levantarla. Una vez retirado, déjelo a un lado, ya que se volverá a utilizar más adelante.

Podemos cepillar o limpiar suavemente cualquier mancha o residuo que pueda haberse acumulado con el tiempo utilizando un cepillo suave o un paño con un poco de alcohol, dejando la pieza limpia y lista para su reinstalación.

crwdns2944171:0crwdnd2944171:0crwdnd2944171:0crwdnd2944171:0crwdne2944171:0