crwdns2933423:0crwdne2933423:0

Samsung Galaxy Tab A9 Plus Screen Replacement

crwdns2931529:0crwdnd2931529:0crwdnd2931529:0crwdnd2931529:05crwdnd2931529:0crwdne2931529:0

crwdns2935425:01crwdne2935425:0

crwdns2936315:0crwdne2936315:0
crwdns2936331:0crwdne2936331:0
crwdns2931653:01crwdne2931653:0
Samsung Galaxy Tab A9 Plus Screen Replacement: crwdns2935265:00crwdnd2935265:01crwdnd2935265:03crwdne2935265:0 Samsung Galaxy Tab A9 Plus Screen Replacement: crwdns2935265:00crwdnd2935265:02crwdnd2935265:03crwdne2935265:0 Samsung Galaxy Tab A9 Plus Screen Replacement: crwdns2935265:00crwdnd2935265:03crwdnd2935265:03crwdne2935265:0
  • Power the device off by holding the power button for 10-15 seconds.

  • Use the heat gun to evenly heat the edge of the device and loosen the adhesive securing the screen to the tablet.

  • The heat gun should be set on 5 when using it to heat the adhesive.

  • Be careful when using the heat gun; it can damage the device if you heat one area too much or for too long.

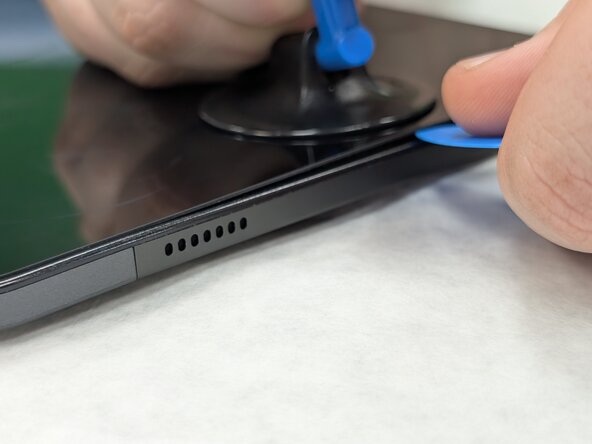
  • Use the suction tool to separate the screen from the case, and insert an opening pick to help keep the screen edge separated from the rest of the device.

  • Slide a second pick around the edge to cut through the remaining glue of the screen.

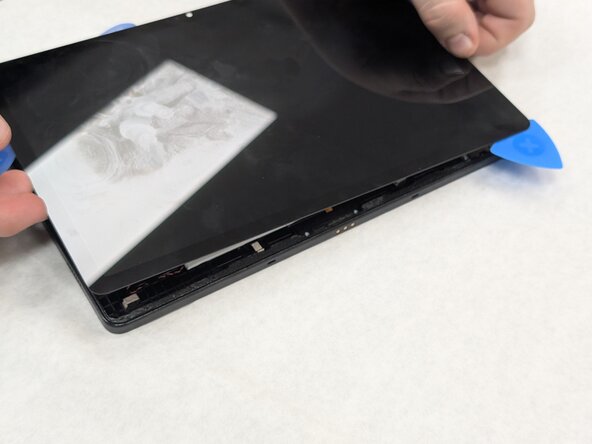
  • Continue placing plastic opening picks in the gaps about every inch or so intill the screen fully separates.

crwdns2935429:0crwdne2935429:0

crwdns2935429:0crwdne2935429:0

crwdns2935429:0crwdne2935429:0

crwdns2935429:0crwdne2935429:0

crwdns2935429:0crwdne2935429:0

crwdns2935429:0crwdne2935429:0

crwdns2935429:0crwdne2935429:0

crwdns2944171:0crwdnd2944171:0crwdnd2944171:0crwdnd2944171:0crwdne2944171:0