crwdns2933423:0crwdne2933423:0

Sony BDP-S360 Optical Disk Drive Replacement

crwdns2936315:0crwdne2936315:0
crwdns2936325:0crwdne2936325:0
crwdns2931653:05crwdne2931653:0
Sony BDP-S360 Optical Disk Drive Replacement: crwdns2935265:00crwdnd2935265:01crwdnd2935265:03crwdne2935265:0 Sony BDP-S360 Optical Disk Drive Replacement: crwdns2935265:00crwdnd2935265:02crwdnd2935265:03crwdne2935265:0 Sony BDP-S360 Optical Disk Drive Replacement: crwdns2935265:00crwdnd2935265:03crwdnd2935265:03crwdne2935265:0
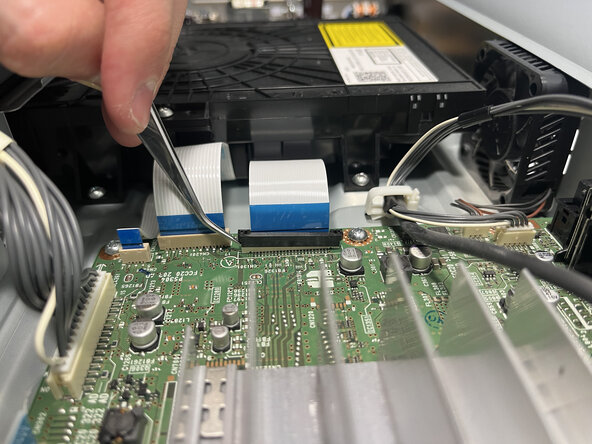
  • Use tweezers to pinch the blue tabs and gently pull out the two ribbon cables connected to the right of the optical disk drive.

  • To reconnect the cable, hold it as close to the end as possible and insert it back into the connector. Apply force to the plastic reinforcement rather than the cable itself.

  • Try not to kink or crease the cable.

  • Use a spudger or tweezers and gently push up on alternating sides of the black locking tab connector connected to the widest ribbon cable before attempting to pull out the cable.

  • Don't push the tab too hard or too far, otherwise it may come completely off the connector.

  • The ribbon cables are delicate and can be damaged if gripped directly.

  • During reassembly, insert the cable into its socket and use the flat end of a spudger to push the tab down into its locked position.

crwdns2935429:0crwdne2935429:0

crwdns2935429:0crwdne2935429:0

crwdns2935429:0crwdne2935429:0

crwdns2935429:0crwdne2935429:0

crwdns2935429:0crwdne2935429:0

crwdns2935429:0crwdne2935429:0

crwdns2935429:0crwdne2935429:0

crwdns2944171:0crwdnd2944171:0crwdnd2944171:0crwdnd2944171:0crwdne2944171:0