crwdns2933423:0crwdne2933423:0

Auftragen des Bildschirmklebers auf dem Microsoft Surface Pro 11

crwdns2936315:0crwdne2936315:0
crwdns2936319:0crwdne2936319:0
crwdns2931653:03crwdne2931653:0
How to Apply Screen Adhesive in Your Microsoft Surface Pro 11, Apply the speaker mesh: crwdns2935265:00crwdnd2935265:01crwdnd2935265:03crwdne2935265:0 How to Apply Screen Adhesive in Your Microsoft Surface Pro 11, Apply the speaker mesh: crwdns2935265:00crwdnd2935265:02crwdnd2935265:03crwdne2935265:0 How to Apply Screen Adhesive in Your Microsoft Surface Pro 11, Apply the speaker mesh: crwdns2935265:00crwdnd2935265:03crwdnd2935265:03crwdne2935265:0
Apply the speaker mesh
  • The speaker meshes are labelled L and R. When applying them, make sure they're on the correct side and that the colored, thicker liner is facing inward.

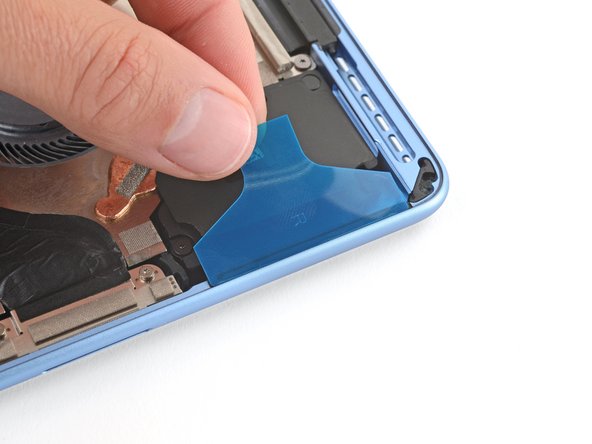
  • Remove the larger, clear liner from one of the speaker meshes and carefully put it into place on the frame.

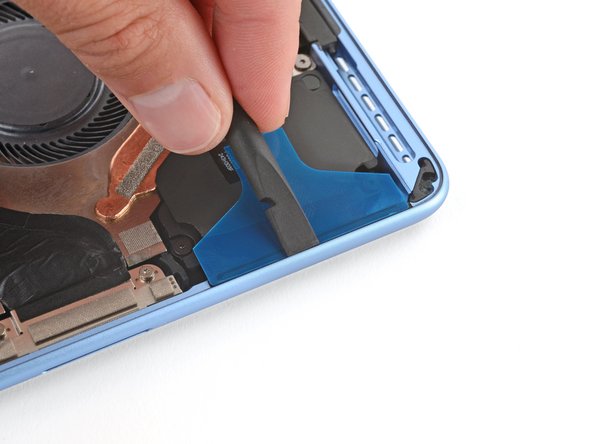
  • Use the flat end of a spudger to firmly push down on the adhesive, securing it to the frame.

  • Leave the remaining colored liner in place for now—it will be removed in a later step.

  • Repeat the process to apply the other speaker mesh.

Die Lautsprechergitter sind mit L und R gekennzeichnet. Achte beim Anbringen darauf, dass sie auf der richtigen Seite liegen und dass die farbige, dickere Unterlage nach innen zeigt.

Entferne die größere, durchsichtige Schutzfolie von einem der Lautsprechergitter und setze sie vorsichtig auf den Rahmen.

Drücke mit dem flachen Ende eines Spudgers fest auf den Kleber, um ihn am Rahmen zu befestigen.

Lasse die restliche farbige Schutzfolie vorerst an Ort und Stelle - sie wird in einem späteren Schritt entfernt.

Wiederhole den Vorgang um das andere Lautsprechergitter anzubringen.

crwdns2944171:0crwdnd2944171:0crwdnd2944171:0crwdnd2944171:0crwdne2944171:0