crwdns2933423:0crwdne2933423:0

Jura Ceramic Valve repair

crwdns2936319:0crwdne2936319:0
crwdns2936315:0crwdne2936315:0
crwdns2931653:02crwdne2931653:0
Jura Keramikventil reparieren: crwdns2935265:00crwdnd2935265:01crwdnd2935265:02crwdne2935265:0 Jura Keramikventil reparieren: crwdns2935265:00crwdnd2935265:02crwdnd2935265:02crwdne2935265:0
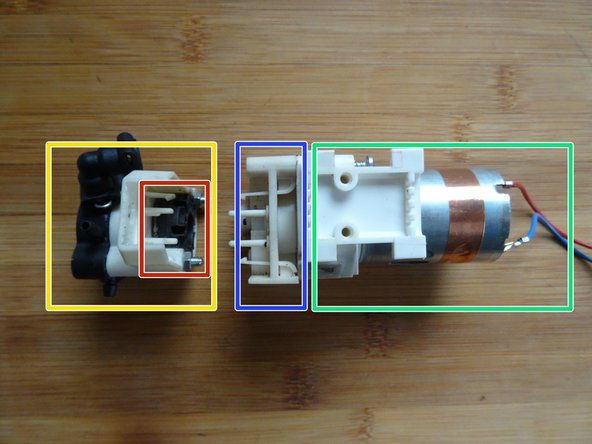
  • Der Verteilerkopf mit den Keramikscheiben ist mit zwei weiteren Torx Schrauben befestigt. Wenn du sie löst, kannst du den Kopf abnehmen. Achte auf die beiden Muttern, die dabei lose werden.

  • Motor

  • Motorflansch

  • Verteilerkopf

  • Nimm den schwarzen Verteilerkopf vorsichtig vom weißen Teil ab. Vorsicht: die Keramikscheiben sind dann frei. Blase in alle Anschlüsse hinein und prüfe, ob sie durchgängig sind. Eventuell musst du den Kopf entkalken.

  • Kontrolliere den Verteilerkopf auf Kalkspuren und Risse. Ersatzteile findest du eventuell hier.

  • Kontrolliere den Mitnehmer auf Abrieb.

  • Arbeite sehr behutsam. Wenn du den Kopf weiter zerlegst, achte auf die genaue Lage der Scheiben. Mache Fotos der Position. Wenn du die Mikroschalter tauschen willst, kannst du den Kopf mit den beiden Muttern provisorisch zusammenhalten.

The distributor head with the ceramic discs is secured with two additional Torx screws. Once you loosen them, you can remove the head. Be sure to note the two nuts that come loose.

Motor

Flange

Distributor head

Carefully remove the black distributor head from the white part. Caution: the ceramic discs are now exposed. Blow into all connections and check that they are clear. You may need to descale the head.

Check the Head for Cracks. You can maybe find replacement parts here.

Check the driver for abrasion.

Work very carefully from here. If you disassemble the head, look at the exact position of every disk and take pictures of them. If you want to replace the Microswitches, you can hold it together provosionally.

crwdns2944171:0crwdnd2944171:0crwdnd2944171:0crwdnd2944171:0crwdne2944171:0