crwdns2933423:0crwdne2933423:0

Het loskoppelen van de WLAN-modulekabels van de HP EliteBook 840 G9

crwdns2931529:0crwdnd2931529:0crwdnd2931529:0crwdnd2931529:04crwdnd2931529:0crwdne2931529:0

crwdns2935425:01crwdne2935425:0

crwdns2936315:0crwdne2936315:0
crwdns2936313:0crwdne2936313:0
crwdns2931653:01crwdne2931653:0
HP EliteBook 840 G9 WLAN Module Cable Disconnection, Disconnect the WLAN module cables: crwdns2935265:00crwdnd2935265:01crwdnd2935265:03crwdne2935265:0 HP EliteBook 840 G9 WLAN Module Cable Disconnection, Disconnect the WLAN module cables: crwdns2935265:00crwdnd2935265:02crwdnd2935265:03crwdne2935265:0 HP EliteBook 840 G9 WLAN Module Cable Disconnection, Disconnect the WLAN module cables: crwdns2935265:00crwdnd2935265:03crwdnd2935265:03crwdne2935265:0
Disconnect the WLAN module cables
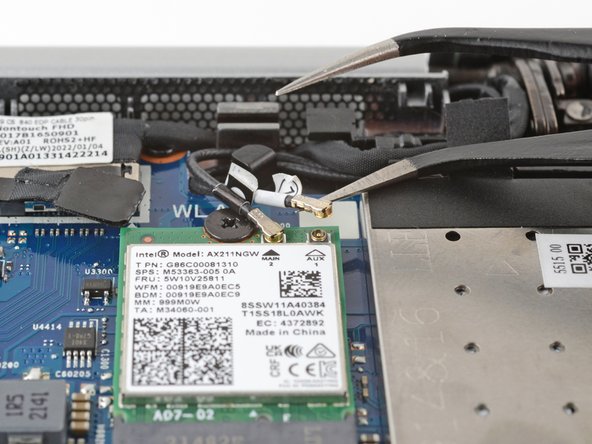
  • Slide an arm of a pair of angled tweezers under the metal neck of one of the coaxial connectors on the WLAN (Wi-Fi) module, near the right hinge.

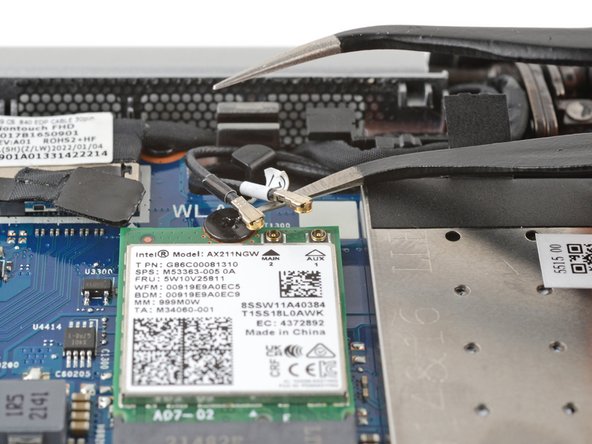
  • Lift straight up to disconnect the cable.

  • Repeat the process to disconnect the remaining coaxial connector.

  • During reassembly:

  • Connect the cable with black tape to the socket with a black arrow below it, and the white cable to the socket with a white arrow.

  • Use tweezers to hold a connector in place over its socket and gently press down with your finger or a spudger—the connector should "snap" into place. If you're having trouble, reposition the head and try again. Don't use excessive force.

Schuif een arm van je pincet onder de metalen kop van een van de coaxiale aansluitingen op de WLAN-module (wifi), bij het rechterscharnier.

Trek de arm in een rechte beweging omhoog om de kabel los te koppelen.

Herhaal deze stappen om ook de andere coaxiale aansluiting los te koppelen.

Bij het weer in elkaar zetten van je toestel:

Sluit je de kabel met de zwarte tape aan op het contact met de zwarte pijl eronder, en de witte kabel op het contact met de witte pijl.

Gebruik je een pincet op de aansluiting boven het contact te plaatsen en druk je de aansluiting vervolgens met je vingers of een spudger in het contact. Als het goed is, hoor je de aansluiting vastklikken. Als het niet lukt, herpositioneer je de aansluiting en probeer je het nog eens. Forceer het niet.

crwdns2944171:0crwdnd2944171:0crwdnd2944171:0crwdnd2944171:0crwdne2944171:0