crwdns2933423:0crwdne2933423:0

HP EliteBook 840 Aero G8 ディスプレイアセンブリの交換

crwdns2931529:0crwdnd2931529:0crwdnd2931529:0crwdnd2931529:05crwdnd2931529:0crwdne2931529:0

crwdns2935425:01crwdne2935425:0

crwdns2936315:0crwdne2936315:0
crwdns2936323:0crwdne2936323:0
crwdns2931653:01crwdne2931653:0
HP EliteBook 840 Aero G8 Display Assembly Replacement, Disconnect the display cable: crwdns2935265:00crwdnd2935265:01crwdnd2935265:02crwdne2935265:0 HP EliteBook 840 Aero G8 Display Assembly Replacement, Disconnect the display cable: crwdns2935265:00crwdnd2935265:02crwdnd2935265:02crwdne2935265:0
Disconnect the display cable
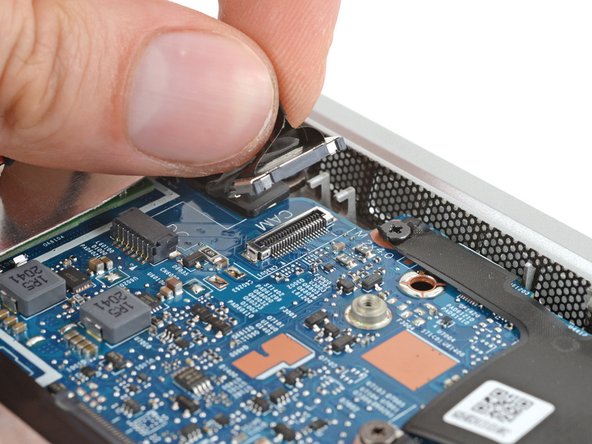
  • Use your fingers to grip the plastic pull tab on the left display cable press connector, near the left hinge.

  • Pull straight up to disconnect the connector.

  • During reassembly, align the connector carefully over its socket and press down with your fingertip—first on one side, then the other—until it clicks into place. Don't try to force the connector into place. If you're having trouble, reposition it and try again. Don't use excessive force.

左ヒンジ近くにある左ディスプレイケーブルのプレス型コネクタのプラスチック製プルタブを指でしっかり掴みます。

コネクタを真上に引き上げて外します。

再組み立て時: コネクタをソケットに慎重に合わせてから、指先で(まず片側、次にもう片側と)カチッと音がして所定の位置にはまるまで押し下げてください。無理にコネクタを押し込もうとしないでください。もし問題がある場合は、位置を調整して再度試してください。過度な力を加えないでください。

crwdns2944171:0crwdnd2944171:0crwdnd2944171:0crwdnd2944171:0crwdne2944171:0