crwdns2933423:0crwdne2933423:0

Desconexión del cable del módulo WLAN del HP EliteBook 840 Aero G8

crwdns2931529:0crwdnd2931529:0crwdnd2931529:0crwdnd2931529:013crwdnd2931529:0crwdne2931529:0

crwdns2935425:01crwdne2935425:0

crwdns2936315:0crwdne2936315:0
crwdns2936331:0crwdne2936331:0
crwdns2931653:01crwdne2931653:0
HP EliteBook 840 Aero G8 WLAN Module Cable Disconnection, Disconnect the WLAN module cables: crwdns2935265:00crwdnd2935265:01crwdnd2935265:03crwdne2935265:0 HP EliteBook 840 Aero G8 WLAN Module Cable Disconnection, Disconnect the WLAN module cables: crwdns2935265:00crwdnd2935265:02crwdnd2935265:03crwdne2935265:0 HP EliteBook 840 Aero G8 WLAN Module Cable Disconnection, Disconnect the WLAN module cables: crwdns2935265:00crwdnd2935265:03crwdnd2935265:03crwdne2935265:0
Disconnect the WLAN module cables
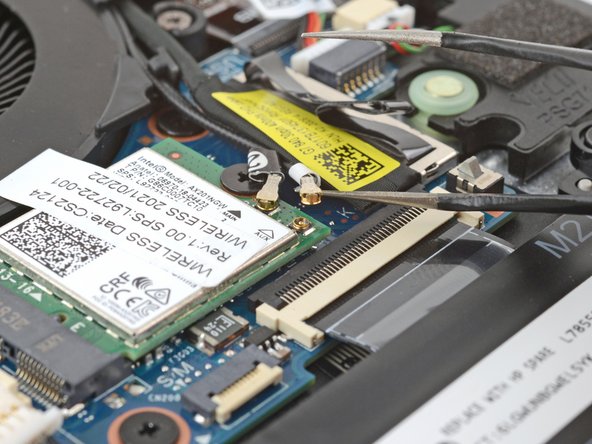
  • Slide an arm of a pair of angled tweezers under the metal neck of one of the coaxial connectors on the WLAN (Wi-Fi) module, located just below the fan.

  • Lift straight up to disconnect the cable.

  • Repeat to disconnect the second connector.

  • During reassembly:

  • Connect the cable with black tape to the socket with a black arrow below it, and the cable with white tape to the socket with a white arrow.

  • Use tweezers to hold a connector in place over its socket and gently press down with your finger or a spudger—the connector should "snap" into place. If you're having trouble, reposition the head and try again. Don't use excessive force.

Desliza un brazo de unas pinzas anguladas bajo el cuello metálico de uno de los conectores coaxiales del módulo WLAN (Wi-Fi), situado justo debajo del ventilador.

Levanta hacia arriba para desconectar el cable.

Repite la operación para desconectar el segundo conector.

Durante el reensamblaje:

Conecta el cable con cinta negra al zócalo con una flecha negra debajo, y el cable con cinta blanca al zócalo con una flecha blanca.

Usa unas pinzas para sujetar un conector en su lugar sobre su zócalo y presiona suavemente con el dedo o con un spudger; el conector debería encajar en su lugar. Si tienes problemas, vuelve a colocar el cabezal e inténtalo de nuevo. No uses fuerza excesiva.

crwdns2944171:0crwdnd2944171:0crwdnd2944171:0crwdnd2944171:0crwdne2944171:0