crwdns2933423:0crwdne2933423:0

HP EliteBook 840 Aero G8 WLAN-Modul Kabel abziehen

crwdns2931529:0crwdnd2931529:0crwdnd2931529:0crwdnd2931529:013crwdnd2931529:0crwdne2931529:0

crwdns2935425:01crwdne2935425:0

crwdns2936315:0crwdne2936315:0
crwdns2936319:0crwdne2936319:0
crwdns2931653:01crwdne2931653:0
HP EliteBook 840 Aero G8 WLAN Module Cable Disconnection, Disconnect the WLAN module cables: crwdns2935265:00crwdnd2935265:01crwdnd2935265:03crwdne2935265:0 HP EliteBook 840 Aero G8 WLAN Module Cable Disconnection, Disconnect the WLAN module cables: crwdns2935265:00crwdnd2935265:02crwdnd2935265:03crwdne2935265:0 HP EliteBook 840 Aero G8 WLAN Module Cable Disconnection, Disconnect the WLAN module cables: crwdns2935265:00crwdnd2935265:03crwdnd2935265:03crwdne2935265:0
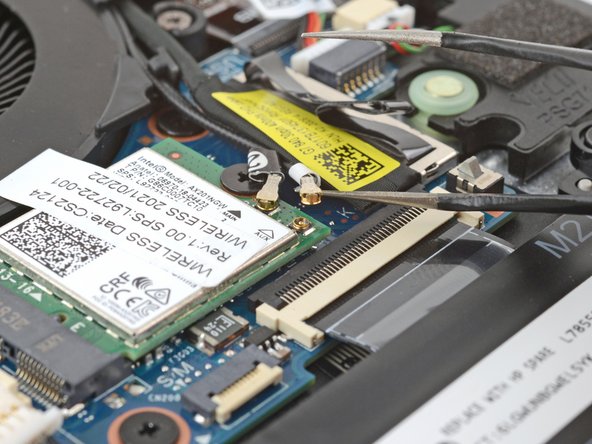
Disconnect the WLAN module cables
  • Slide an arm of a pair of angled tweezers under the metal neck of one of the coaxial connectors on the WLAN (Wi-Fi) module, located just below the fan.

  • Lift straight up to disconnect the cable.

  • Repeat to disconnect the second connector.

  • During reassembly:

  • Connect the cable with black tape to the socket with a black arrow below it, and the cable with white tape to the socket with a white arrow.

  • Use tweezers to hold a connector in place over its socket and gently press down with your finger or a spudger—the connector should "snap" into place. If you're having trouble, reposition the head and try again. Don't use excessive force.

Führe eine gebogene Pinzette unter den Metallkragen eines der Koaxialstecker auf dem WLAN-Modul, direkt unterhalb des Lüfters.

Hebe den Stecker gerade nach oben, um es zu lösen.

Wiederhole den Vorgang, um den verbleibenden Koaxialstecker zu trennen.

Beim Wiederzusammenbau:

Verbinde das Kabel mit Gewebeband mit dem Anschluss, unter dem ein schwarzer Pfeil abgebildet ist. Das weiße Kabel gehört an den Anschluss mit dem weißen Pfeil.

Halte den Stecker mit einer Pinzette über der Buchse und drücke ihn vorsichtig mit dem Finger oder einem Spudger nach unten – er sollte hörbar einrasten. Wenn das nicht klappt, richte ihn neu aus und versuche es erneut. Übe dabei keinen übermäßigen Druck aus.

crwdns2944171:0crwdnd2944171:0crwdnd2944171:0crwdnd2944171:0crwdne2944171:0