crwdns2933423:0crwdne2933423:0

HP EliteBook 840 G9 Display Einheit austauschen

crwdns2931527:0crwdnd2931527:0crwdnd2931527:0crwdnd2931527:0crwdne2931527:0

crwdns2936315:0crwdne2936315:0
crwdns2936319:0crwdne2936319:0
crwdns2931653:04crwdne2931653:0
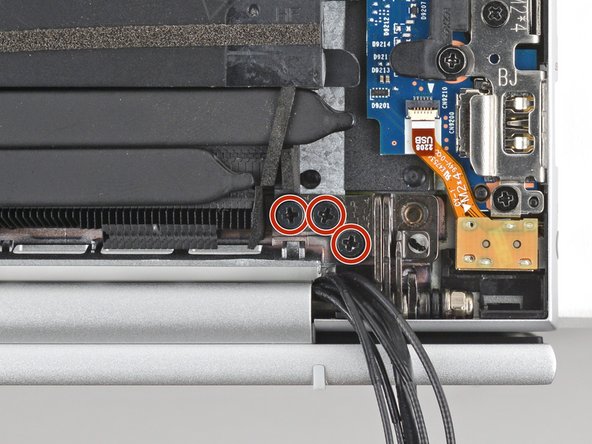
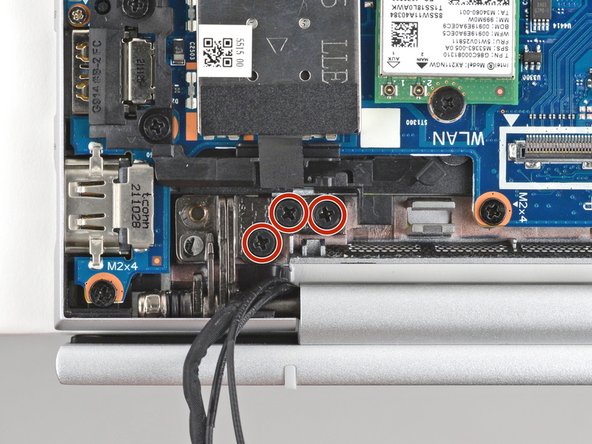
HP EliteBook 840 G9 Display Assembly Replacement, Remove the hinge screws: crwdns2935265:00crwdnd2935265:01crwdnd2935265:03crwdne2935265:0 HP EliteBook 840 G9 Display Assembly Replacement, Remove the hinge screws: crwdns2935265:00crwdnd2935265:02crwdnd2935265:03crwdne2935265:0 HP EliteBook 840 G9 Display Assembly Replacement, Remove the hinge screws: crwdns2935265:00crwdnd2935265:03crwdnd2935265:03crwdne2935265:0
Remove the hinge screws
  • Hold your laptop steady with your free hand while removing or installing hinge screws—don't let it fall off of your work surface.

  • Use a Phillips screwdriver to remove the six 4.6 mm‑long hinge screws—three in each hinge.

  • During reassembly, make sure the display is properly aligned before tightening the hinge screws.

Halte deinen Laptop immer mit einer Hand fest, während du die Schrauben des Scharniers herausziehst oder einbaust, damit er nicht von der Arbeitsfläche fällt.

Ziehe die sechs 4,6 mm langen Schrauben in den Scharnieren mithilfe eines Kreuzschlitz Schraubendrehers heraus - drei in jedem Scharnier.

Achte beim Wiederzusammenbau darauf, dass das Display richtig ausgerichtet ist, bevor du die Schrauben des Scharniers festziehst.

crwdns2944171:0crwdnd2944171:0crwdnd2944171:0crwdnd2944171:0crwdne2944171:0