crwdns2933423:0crwdne2933423:0

HP EliteBook 840 G9 WWAN 모듈 교체

crwdns2931527:0crwdnd2931527:0crwdnd2931527:0crwdnd2931527:0crwdne2931527:0

crwdns2935425:01crwdne2935425:0

crwdns2936315:0crwdne2936315:0
crwdns2936325:0crwdne2936325:0
crwdns2931653:01crwdne2931653:0
HP EliteBook 840 G9 WWAN Module Replacement, Disconnect the WWAN module: crwdns2935265:00crwdnd2935265:01crwdnd2935265:03crwdne2935265:0 HP EliteBook 840 G9 WWAN Module Replacement, Disconnect the WWAN module: crwdns2935265:00crwdnd2935265:02crwdnd2935265:03crwdne2935265:0 HP EliteBook 840 G9 WWAN Module Replacement, Disconnect the WWAN module: crwdns2935265:00crwdnd2935265:03crwdnd2935265:03crwdne2935265:0
Disconnect the WWAN module
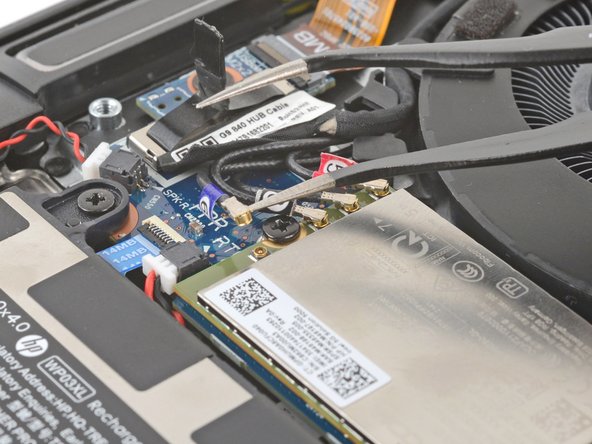
  • Slide one arm of a pair of angled tweezers under the metal neck of one of the coaxial connectors on the WWAN (cellular) module.

  • Lift straight up to disconnect the cable.

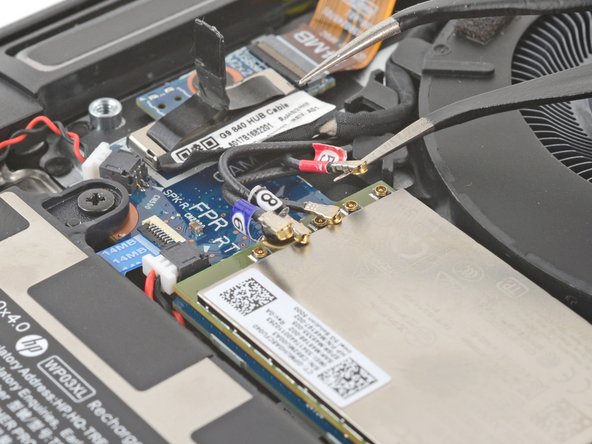
  • Repeat the process to disconnect the three remaining coaxial connectors.

  • During reassembly:

  • Use the numbered pieces of tape on the cables and their corresponding markings on the WWAN module to correctly connect each cable.

  • Use tweezers to hold a connector in place over its socket and gently press down with your finger or a spudger—the connector should "snap" into place. If you're having trouble, reposition the head and try again. Don't use excessive force.

굽은 핀셋의 한쪽 팔을 WWAN(셀룰러) 모듈에 있는 동축 커넥터 중 하나의 금속 목 아래로 밀어 넣으세요.

똑바로 들어 올려 케이블을 연결 해제하세요.

나머지 세 개의 동축 커넥터도 같은 방법으로 연결을 해제하세요.

재조립할 때:

케이블에 부착된 번호가 표시된 테이프와 WWAN 모듈의 해당 표시를 참고하여 각 케이블을 정확히 연결합니다.

핀셋으로 커넥터를 소켓 위의 제자리에 잡고 손가락이나 스퍼저로 살살 눌러주세요—커넥터는 “딸깍” 소리와 함께 제자리에 고정되어야 합니다. 문제가 발생하면 커넥터의 위치를 조절하고 다시 시도하세요. 과도한 힘을 사용하지 마세요.

crwdns2944171:0crwdnd2944171:0crwdnd2944171:0crwdnd2944171:0crwdne2944171:0