crwdns2933423:0crwdne2933423:0

Changement dissipateur thermique HP EliteBook 840 G9

crwdns2931527:0crwdnd2931527:0crwdnd2931527:0crwdnd2931527:0crwdne2931527:0

crwdns2935425:01crwdne2935425:0

crwdns2936315:0crwdne2936315:0
crwdns2936317:0crwdne2936317:0
crwdns2931653:01crwdne2931653:0
HP EliteBook 840 G9 Heat Sink Replacement, Remove the heatsink: crwdns2935265:00crwdnd2935265:01crwdnd2935265:03crwdne2935265:0 HP EliteBook 840 G9 Heat Sink Replacement, Remove the heatsink: crwdns2935265:00crwdnd2935265:02crwdnd2935265:03crwdne2935265:0 HP EliteBook 840 G9 Heat Sink Replacement, Remove the heatsink: crwdns2935265:00crwdnd2935265:03crwdnd2935265:03crwdne2935265:0
Remove the heatsink
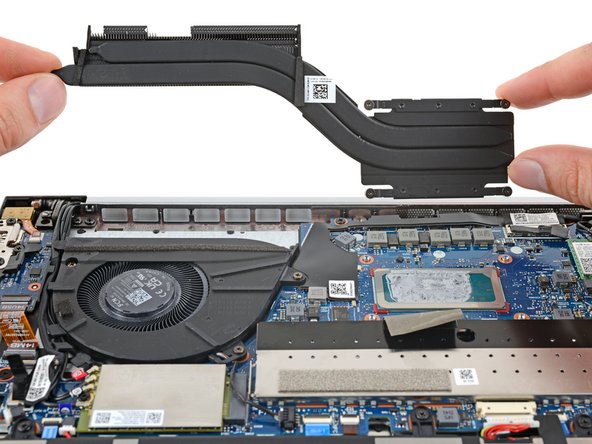
  • Lift and remove the heat sink.

  • During reassembly:

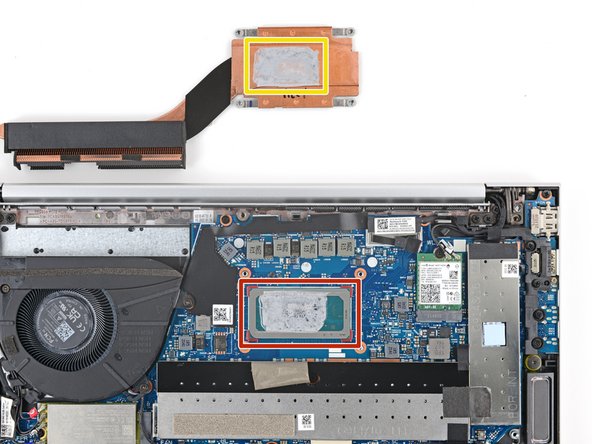
  • Check if your replacement heat sink comes with thermal paste pre‑installed on the bottom. If it does, do not apply new thermal paste.

  • Follow this guide to clean the CPU and apply new thermal paste.

  • If you're reusing the heat sink, make sure to clean it as well.

Soulevez et retirez le dissipateur thermique.

Lors du remontage :

Vérifiez si le dissipateur thermique de remplacement est livré avec de la pâte thermique préinstallée sur la partie inférieure. Si c'est le cas, n'appliquez pas de nouvelle couche de pâte thermique.

Consultez ce tutoriel pour nettoyer le processeur et appliquer une nouvelle couche de pâte thermique.

Si vous réutilisez le dissipateur thermique, veillez également à le nettoyer.

crwdns2944171:0crwdnd2944171:0crwdnd2944171:0crwdnd2944171:0crwdne2944171:0