crwdns2933423:0crwdne2933423:0

Changement boîtier inférieur HP EliteBook 840 G9

crwdns2931529:0crwdnd2931529:0crwdnd2931529:0crwdnd2931529:033crwdnd2931529:0crwdne2931529:0

crwdns2935425:05crwdne2935425:0

crwdns2936315:0crwdne2936315:0
crwdns2936317:0crwdne2936317:0
crwdns2931653:05crwdne2931653:0
HP EliteBook 840 G9 Bottom Cover Replacement, Remove the bottom cover: crwdns2935265:00crwdnd2935265:01crwdnd2935265:03crwdne2935265:0 HP EliteBook 840 G9 Bottom Cover Replacement, Remove the bottom cover: crwdns2935265:00crwdnd2935265:02crwdnd2935265:03crwdne2935265:0 HP EliteBook 840 G9 Bottom Cover Replacement, Remove the bottom cover: crwdns2935265:00crwdnd2935265:03crwdnd2935265:03crwdne2935265:0
Remove the bottom cover
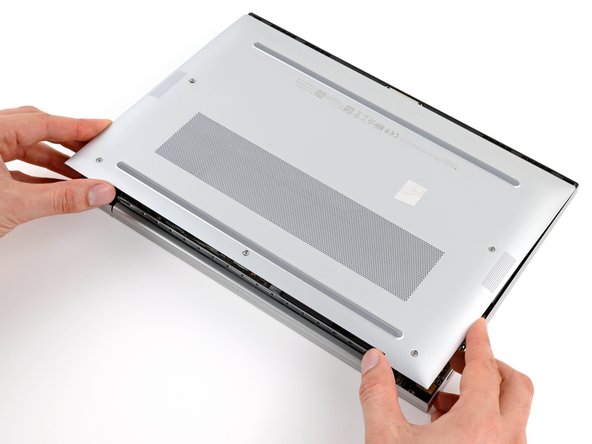
  • Slide the cover towards the screen hinge to disengage the clips on the opposite edge.

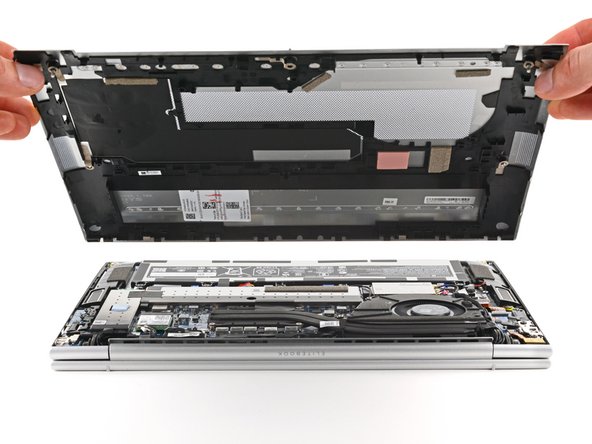
  • Lift and remove the cover.

  • The cover should come away easily. If you feel resistance, use the flat end of a spudger to release any remaining clips.

  • During reassembly, slide the clips along the front edge of the cover (opposite the hinge) into their slots on the frame, then lay the cover down. Firmly press around the perimeter of the cover to engage all the clips.

Faites glisser le boîtier vers les charnières de l'écran, afin de détacher les clips du côté opposé.

Soulevez et retirez le boîtier.

Le boîtier devrait s'ouvrir facilement. Si vous rencontrez une résistance, utilisez l'extrémité plate d'une spatule pour détacher les clips restants.

Lors du remontage, glissez les clips le long du côté avant du boîtier (à l'opposé des charnières) dans leurs emplacements sur le châssis, puis posez le boîtier. Appuyez fermement sur tout le pourtour du boîtier pour enclencher tous les clips.

crwdns2944171:0crwdnd2944171:0crwdnd2944171:0crwdnd2944171:0crwdne2944171:0