crwdns2933423:0crwdne2933423:0

Het vervangen van de onderkant van de HP EliteBook 840 G9

crwdns2931529:0crwdnd2931529:0crwdnd2931529:0crwdnd2931529:033crwdnd2931529:0crwdne2931529:0

crwdns2936315:0crwdne2936315:0
crwdns2936313:0crwdne2936313:0
crwdns2931653:02crwdne2931653:0
HP EliteBook 840 G9 Bottom Cover Replacement, Release the bottom cover clips: crwdns2935265:00crwdnd2935265:01crwdnd2935265:02crwdne2935265:0 HP EliteBook 840 G9 Bottom Cover Replacement, Release the bottom cover clips: crwdns2935265:00crwdnd2935265:02crwdnd2935265:02crwdne2935265:0
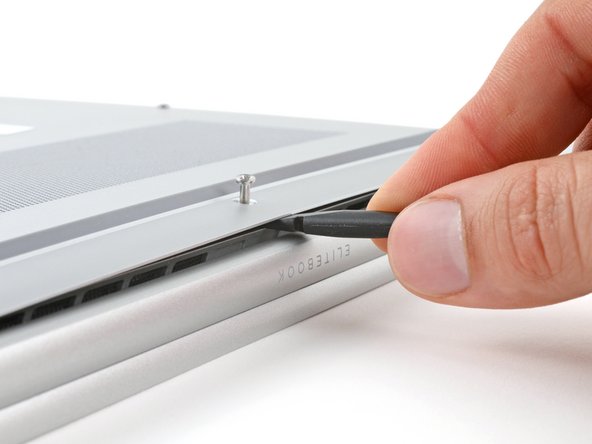
Release the bottom cover clips
  • Position your laptop so the rear edge (with the screen hinge) is closest to you.

  • Insert the flat end of a spudger between the rear edge of the bottom cover and the frame, near the middle screw and ELITEBOOK text.

  • If you're having trouble inserting your spudger, make sure the screw is fully loosened. If necessary, use your fingers to gently pull the screw up.

  • Use your spudger to pry up the cover to release the clip securing it.

  • Leave the spudger inserted under the bottom cover for the next step.

Plaats je laptop zo dat de achterkant (waar de scharnieren van het scherm zich bevinden) naar je toe wijst.

Steek het platte deel van een spudger, bij de middelste schroef en op de plek waar ELITEBOOK staat, tussen de achterste rand van het onderste paneel en het frame.

Als het je niet lukt om de spudger in de opening tussen het onderste paneel en het frame te steken, controleer je of de schroef wel helemaal is losgedraaid. Trek de schroef, indien nodig, met je vingers omhoog om een kleine opening voor je spudger te creëren.

Wrik je spudger wat omhoog om de klem van het onderste paneel los te maken.

Laat je spudger in de opening zitten.

crwdns2944171:0crwdnd2944171:0crwdnd2944171:0crwdnd2944171:0crwdne2944171:0