crwdns2933423:0crwdne2933423:0

HP EliteBook 840 G9 底面カバーの交換

crwdns2931529:0crwdnd2931529:0crwdnd2931529:0crwdnd2931529:033crwdnd2931529:0crwdne2931529:0

crwdns2936315:0crwdne2936315:0
crwdns2936323:0crwdne2936323:0
crwdns2931653:02crwdne2931653:0
HP EliteBook 840 G9 Bottom Cover Replacement, Release the bottom cover clips: crwdns2935265:00crwdnd2935265:01crwdnd2935265:02crwdne2935265:0 HP EliteBook 840 G9 Bottom Cover Replacement, Release the bottom cover clips: crwdns2935265:00crwdnd2935265:02crwdnd2935265:02crwdne2935265:0
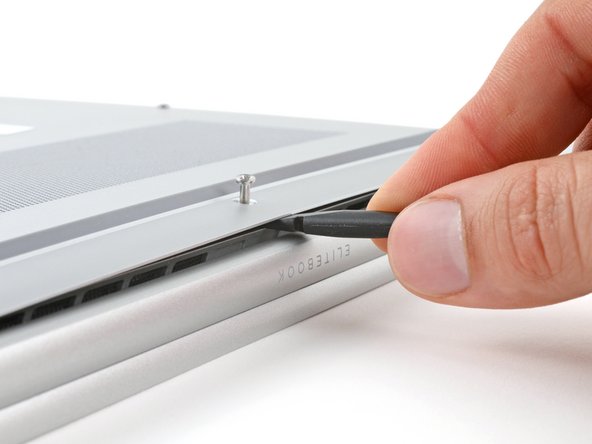
Release the bottom cover clips
  • Position your laptop so the rear edge (with the screen hinge) is closest to you.

  • Insert the flat end of a spudger between the rear edge of the bottom cover and the frame, near the middle screw and ELITEBOOK text.

  • If you're having trouble inserting your spudger, make sure the screw is fully loosened. If necessary, use your fingers to gently pull the screw up.

  • Use your spudger to pry up the cover to release the clip securing it.

  • Leave the spudger inserted under the bottom cover for the next step.

ノートパソコンを、背面側(スクリーンのヒンジがある側)が自分の手前に来るように置いてください。

スパッジャーの平面側先端を、底面カバーの背面側の縁とフレームの間に、中央のネジと「ELITEBOOK」の文字の近くに差し込みます。

スパッジャーが挿入しにくい場合は、ネジが完全に緩んでいることを確認してください。必要に応じて、指でネジを軽く引き上げてください。

スパッジャーを使ってカバーを持ち上げ、固定しているクリップを外します。

次の手順のために、スパッジャーを底面カバーの下に差し込んだままにします。

crwdns2944171:0crwdnd2944171:0crwdnd2944171:0crwdnd2944171:0crwdne2944171:0