crwdns2933423:0crwdne2933423:0

HP EliteBook 840 G9 untere Abdeckung ersetzen

crwdns2931529:0crwdnd2931529:0crwdnd2931529:0crwdnd2931529:033crwdnd2931529:0crwdne2931529:0

crwdns2936315:0crwdne2936315:0
crwdns2936319:0crwdne2936319:0
crwdns2931653:02crwdne2931653:0
HP EliteBook 840 G9 Bottom Cover Replacement, Release the bottom cover clips: crwdns2935265:00crwdnd2935265:01crwdnd2935265:02crwdne2935265:0 HP EliteBook 840 G9 Bottom Cover Replacement, Release the bottom cover clips: crwdns2935265:00crwdnd2935265:02crwdnd2935265:02crwdne2935265:0
Release the bottom cover clips
  • Position your laptop so the rear edge (with the screen hinge) is closest to you.

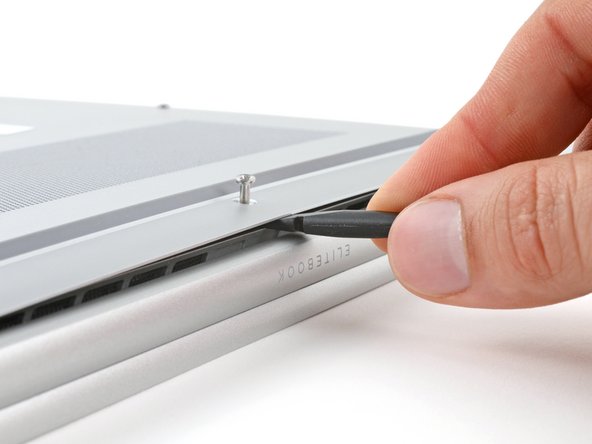
  • Insert the flat end of a spudger between the rear edge of the bottom cover and the frame, near the middle screw and ELITEBOOK text.

  • If you're having trouble inserting your spudger, make sure the screw is fully loosened. If necessary, use your fingers to gently pull the screw up.

  • Use your spudger to pry up the cover to release the clip securing it.

  • Leave the spudger inserted under the bottom cover for the next step.

Lege deinen Laptop so hin, dass die hintere Kante (mit dem Scharnier des Bildschirms) am nächsten zu dir ist.

Führe das flache Ende eines Spudgers zwischen der hinteren Kante der unteren Abdeckung und dem Rahmen ein, in der Nähe der mittleren Schraube und des Textes „ELITEBOOK“.

Wenn du Probleme beim Einführen deines Spudgers hast, achte darauf, dass sich die Schraube vollständig gelöst hat. Falls nötig, kannst du deine Finger verwenden, um die Schraube vorsichtig nach oben zu ziehen.

Du kannst deinen Spudger verwenden, um die Abdeckung aufzuhebeln und den Clip zu lösen, mit dem sie befestigt ist.

Lass den Spudger für den nächsten Schritt unter der unteren Abdeckung stecken.

crwdns2944171:0crwdnd2944171:0crwdnd2944171:0crwdnd2944171:0crwdne2944171:0