crwdns2933423:0crwdne2933423:0

Casio G-shock GA-201 Battery Replacement

crwdns2936315:0crwdne2936315:0
crwdns2936323:0crwdne2936323:0
crwdns2931653:04crwdne2931653:0
Casio G-shock GA-201 Battery Replacement, New battery: crwdns2935265:00crwdnd2935265:01crwdnd2935265:03crwdne2935265:0 Casio G-shock GA-201 Battery Replacement, New battery: crwdns2935265:00crwdnd2935265:02crwdnd2935265:03crwdne2935265:0 Casio G-shock GA-201 Battery Replacement, New battery: crwdns2935265:00crwdnd2935265:03crwdnd2935265:03crwdne2935265:0
New battery
  • Use plastic tweezers or your fingers to insert a new battery

  • One of the reasons why I made this post is because in some guides people used metal tweezers to insert a new battery. This will short it and potentially damage it which can result in watch damage as well.

  • Close the metal battery retainer and clip it back to the plastic clip

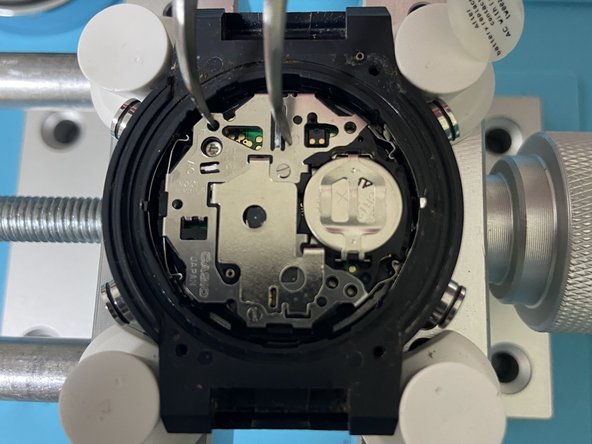
  • Next, we will read what is written on the battery sticker and do so

  • On the second photo you can see how to use metal tweezers to connect (-) to AC. AC is marked with the arrow on the metal shroud of the watch movement

  • It is not bad idea to flip the watch afterwards to make sure that it is working. Be careful that the movement doesn’t fall out of the case

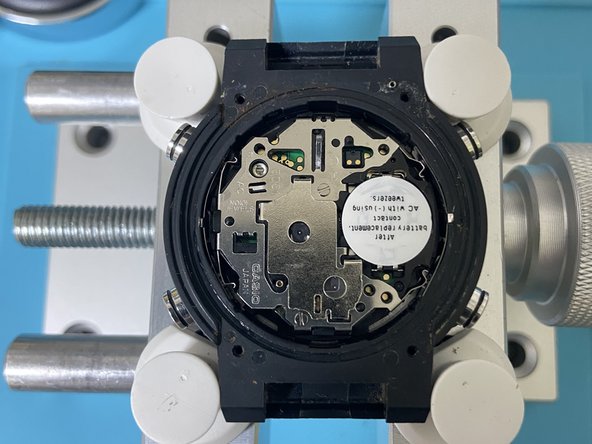
  • For some reason on lots of tutorials people are just ignoring the note on the battery sticker. It is there for a reason so that is why this step is documented here

  • Returning sticker back to its place so that the next person who will be doing the replacement know what to do

crwdns2935429:0crwdne2935429:0

crwdns2935429:0crwdne2935429:0

crwdns2935429:0crwdne2935429:0

crwdns2935429:0crwdne2935429:0

crwdns2935429:0crwdne2935429:0

crwdns2935429:0crwdne2935429:0

crwdns2935429:0crwdne2935429:0

crwdns2935429:0crwdne2935429:0

crwdns2944171:0crwdnd2944171:0crwdnd2944171:0crwdnd2944171:0crwdne2944171:0