crwdns2933423:0crwdne2933423:0

W-King X10 Akku tauschen

crwdns2931529:0crwdnd2931529:0crwdnd2931529:0crwdnd2931529:03crwdnd2931529:0crwdne2931529:0

crwdns2936315:0crwdne2936315:0
crwdns2936319:0crwdne2936319:0
crwdns2931653:06crwdne2931653:0
W-King X10 Battery Replacement: crwdns2935265:00crwdnd2935265:01crwdnd2935265:03crwdne2935265:0 W-King X10 Battery Replacement: crwdns2935265:00crwdnd2935265:02crwdnd2935265:03crwdne2935265:0 W-King X10 Battery Replacement: crwdns2935265:00crwdnd2935265:03crwdnd2935265:03crwdne2935265:0
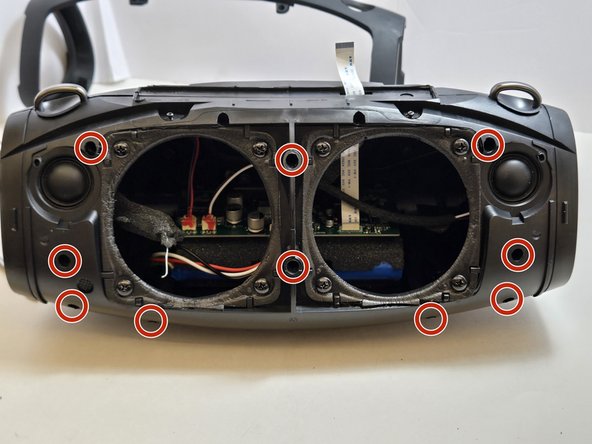
  • Use a 2.5 millimeter hex key to remove the ten 17.5 mm screws that connect the two halves of the X10 casing.

  • Several of these hex screws are in deep, narrow holes in the casing. We recommend using a full-length hex key rather than a hex bit at the end of a driver.

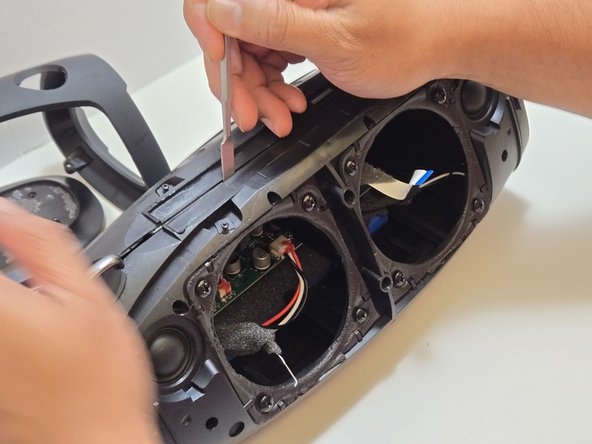
  • Separate the two halves of the casing using the metal spudger to pry apart the 10 connection arms that form the structure of the casing.

  • If this is the first time opening the casing of this X10, there will be glue around the seam of the casing. Use the spudger to split the glue to loosen the seam.

Die beiden Gehäusehälften des X10 werden von zehn Innensechskantschrauben zusammen gehalten. Drehe sie mit einem 2,5 mm Inbusschlüssel heraus.

Einige dieser Schrauben befinden sich in tiefen engen Löchern. Ein langer Inbusschlüssel ist besser geeignet, als ein Bit.

Trenne die beiden Gehäusehälften mit einem Spatel an den zehn Verbindungsstellen.

Beim ersten Öffnen des X10 sind die Gehäusehälften noch verklebt. Trenne den Kleber rund um den Rand herum mit einem Spudger auf.

crwdns2944171:0crwdnd2944171:0crwdnd2944171:0crwdnd2944171:0crwdne2944171:0