crwdns2933423:0crwdne2933423:0

Changement panneau frontal batterie externe multifonction FixHub

crwdns2935425:02crwdne2935425:0

crwdns2936315:0crwdne2936315:0
crwdns2936317:0crwdne2936317:0
crwdns2931653:02crwdne2931653:0
Portable Power Station Front Panel Replacement, Remove the front panel: crwdns2935265:00crwdnd2935265:01crwdnd2935265:03crwdne2935265:0 Portable Power Station Front Panel Replacement, Remove the front panel: crwdns2935265:00crwdnd2935265:02crwdnd2935265:03crwdne2935265:0 Portable Power Station Front Panel Replacement, Remove the front panel: crwdns2935265:00crwdnd2935265:03crwdnd2935265:03crwdne2935265:0
Remove the front panel
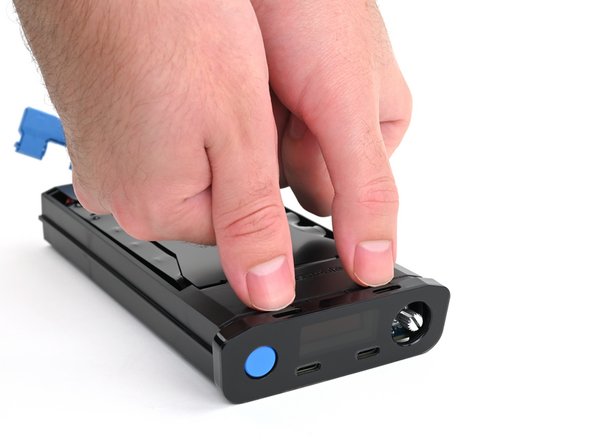
  • Use your fingers to depress the two locking tabs holding the front panel in place.

  • Press on the clips themselves (just behind the front panel) and not through the cutouts on the top edge of the front panel.

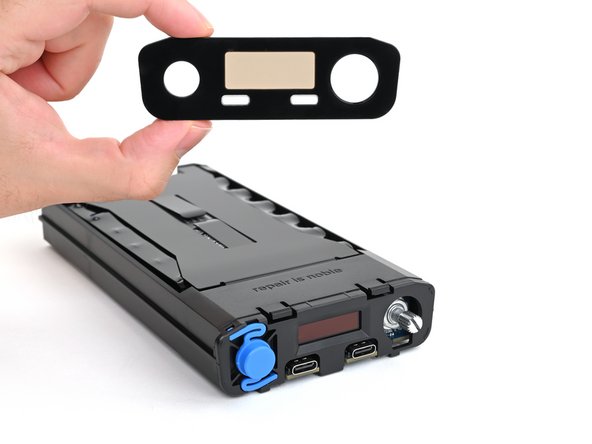
  • While pressing the tabs down, push the front panel away from the chassis and remove it.

  • During reassembly:

  • Hook in the bottom edge of the front panel first, then push the top edge until it clicks into place.

  • Make sure the two USB-C ports slide into their cutouts in the front panel and aren't trapped underneath.

Utilisez vos doigts pour appuyer sur les deux languettes de verrouillage qui maintiennent le panneau frontal en place.

Appuyez sur les clips eux-mêmes (juste derrière le panneau frontal) et non sur les découpes situées sur le bord supérieur du panneau frontal.

Tout en appuyant sur les languettes, écartez le panneau frontal du châssis en le poussant et retirez-le.

Lors du remontage :

Accrochez d'abord le bord inférieur du panneau frontal, puis poussez le bord supérieur jusqu'à ce qu'il s'enclenche.

Assurez-vous que les deux ports USB-C glissent dans leurs découpes sur le panneau frontal et ne sont pas coincés en dessous.

crwdns2944171:0crwdnd2944171:0crwdnd2944171:0crwdnd2944171:0crwdne2944171:0