crwdns2933423:0crwdne2933423:0

Google Pixel 9 Pro XL - スクリーンの交換

crwdns2931527:0crwdnd2931527:0crwdnd2931527:0crwdnd2931527:0crwdne2931527:0

crwdns2936315:0crwdne2936315:0
crwdns2936323:0crwdne2936323:0
crwdns2931653:014crwdne2931653:0
Google Pixel 9 Pro XL Screen Replacement: crwdns2935265:00crwdnd2935265:01crwdnd2935265:02crwdne2935265:0 Google Pixel 9 Pro XL Screen Replacement: crwdns2935265:00crwdnd2935265:02crwdnd2935265:02crwdne2935265:0
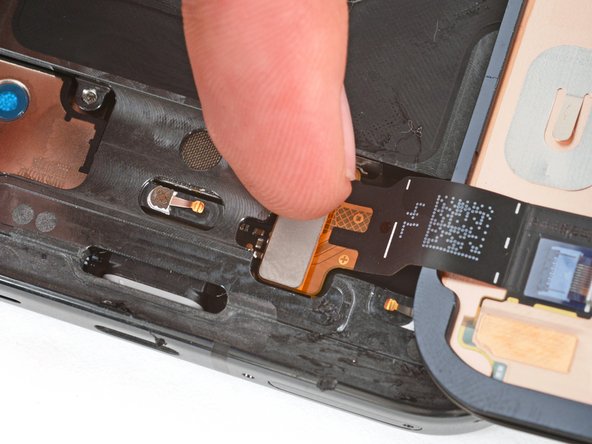
  • Be very careful not to strain the screen cable during this step. You may need to hold the screen up at an angle to help position the cable.

  • Align the screen press connector over its socket and gently press down on one side until it clicks into place, then press down on the other side.

  • Don't press down in the middle. If the connector is misaligned, the pins can bend and cause permanent damage.

  • Now is a good time to test your phone before sealing it up. Power it on and check that it works. Power it back down before you continue reassembly.

  • Hook the bottom edge of the screen cable bracket into its cutout and firmly press down on the top edge until the bracket clicks into place.

この手順では、スクリーンケーブルに圧力をかけないよう十分注意してください。スクリーンを斜めにして、ケーブルの位置を調整してから作業を進めてください。

スクリーンのプレスコネクタをソケットに合わせ、カチッと音がするまで片側を軽く押し込み、反対側も同様に押し込んで装着します。

中央部分を押し込まないでください。コネクタの位置がずれていると、ピンが曲がって永久的な損傷を与える可能性があります。

デバイスを密封する前に、携帯電話をテストする良い機会です。電源を入れ、動作することを確認してください。再組み立てを続ける前に、電源を必ず切ってください。

スクリーンのケーブルブラケット下端を切り込みに引っ掛けて、ブラケットがカチッと音がするまで上端をしっかりと押し下げます。

crwdns2944171:0crwdnd2944171:0crwdnd2944171:0crwdnd2944171:0crwdne2944171:0