crwdns2933423:0crwdne2933423:0

HMD Fusion Vervanging van het oplaadbord

crwdns2931529:0crwdnd2931529:0crwdnd2931529:0crwdnd2931529:02crwdnd2931529:0crwdne2931529:0

crwdns2935425:01crwdne2935425:0

crwdns2936315:0crwdne2936315:0
crwdns2936313:0crwdne2936313:0
crwdns2931653:01crwdne2931653:0
HMD Fusion Charging Board Replacement, Remove the loudspeaker screws: crwdns2935265:00crwdnd2935265:01crwdnd2935265:02crwdne2935265:0 HMD Fusion Charging Board Replacement, Remove the loudspeaker screws: crwdns2935265:00crwdnd2935265:02crwdnd2935265:02crwdne2935265:0
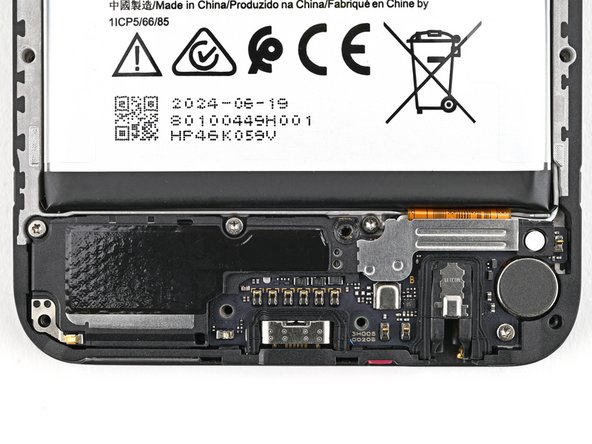
Remove the loudspeaker screws
  • Be careful not to puncture or damage the battery with your tool during the rest of this guide.

  • Use a T3 Torx screwdriver to remove the three 3.4 mm‑long screws securing the loudspeaker.

  • One of the screws on the loudspeaker may be covered by a sticker. Pierce through it with your screwdriver, or use tweezers to remove it.

Wees voorzichtig en voorkom dat je uitschiet met je tool en per ongeluk in de batterij steekt of prikt.

Gebruik een T3 Torx-schroevendraaier(bitje) om de drie 3.4 mm lange schroeven die de luidspreker bevestigen te verwijderen.

Mogelijk zit een van de schroeven in de luidspreker verborgen onder een sticker. Prik de sticker door met je schroevendraaier of gebruik een pincet om de sticker te verwijderen.

crwdns2944171:0crwdnd2944171:0crwdnd2944171:0crwdnd2944171:0crwdne2944171:0