crwdns2933423:0crwdne2933423:0

Google Pixel 9 Rückseitenglas tauschen

crwdns2931529:0crwdnd2931529:0crwdnd2931529:0crwdnd2931529:08crwdnd2931529:0crwdne2931529:0

crwdns2935425:01crwdne2935425:0

crwdns2936315:0crwdne2936315:0
crwdns2936319:0crwdne2936319:0
crwdns2931653:01crwdne2931653:0
Google Pixel 9 Back Glass Replacement, Adhesive information: crwdns2935265:00crwdnd2935265:01crwdnd2935265:03crwdne2935265:0 Google Pixel 9 Back Glass Replacement, Adhesive information: crwdns2935265:00crwdnd2935265:02crwdnd2935265:03crwdne2935265:0 Google Pixel 9 Back Glass Replacement, Adhesive information: crwdns2935265:00crwdnd2935265:03crwdnd2935265:03crwdne2935265:0
Adhesive information
  • Adhesive secures the perimeter of the back glass to the frame.

  • When separating the adhesive, don't insert your tool more than 3 mm under the back glass to avoid damaging the internal components.

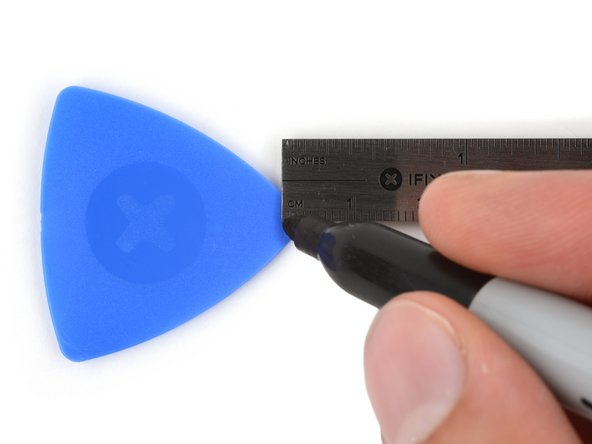
  • To help, measure and mark 3 mm from the tip of an opening pick with a permanent marker.

  • If your screen or back glass is badly cracked, a suction cup may not perfectly adhere.

  • Lay overlapping strips of packing tape over the glass to protect yourself and make disassembly easier. Ensure there's a smooth area near the bottom edge that's large and smooth enough for a suction cup to stick to.

Das Rückseitenglas ist rundum am Rand des Rahmens festgeklebt.

Setze das Werkzeug beim Auftrennen des Klebers nicht tiefer als 3 mm unter das Rückseitenglas ein, damit keine inneren Bauteile beschädigt werden.

Markiere als Hilfe ein Plektrum 3 mm von der Spitze entfernt mit einem Marker.

Wenn das Rückseitenglas stark zerbrochen ist, haftet der Saugheber nicht gut.

Klebe überlappende Streifen von durchsichtigem Paketband über das Display, um dich zu schützen und den Öffnungsvorgang zu erleichtern. Achte darauf, dass nahe bei der Unterkante ein glatter Bereich entsteht, an dem ein Saugheber gut befestigt werden kann.

crwdns2944171:0crwdnd2944171:0crwdnd2944171:0crwdnd2944171:0crwdne2944171:0