crwdns2933423:0crwdne2933423:0

Reemplazo de la batería del Google Pixel 9

crwdns2936315:0crwdne2936315:0
crwdns2936331:0crwdne2936331:0
crwdns2931653:019crwdne2931653:0
Google Pixel 9 Battery Replacement, Separate the battery adhesive: crwdns2935265:00crwdnd2935265:01crwdnd2935265:03crwdne2935265:0 Google Pixel 9 Battery Replacement, Separate the battery adhesive: crwdns2935265:00crwdnd2935265:02crwdnd2935265:03crwdne2935265:0 Google Pixel 9 Battery Replacement, Separate the battery adhesive: crwdns2935265:00crwdnd2935265:03crwdnd2935265:03crwdne2935265:0
Separate the battery adhesive
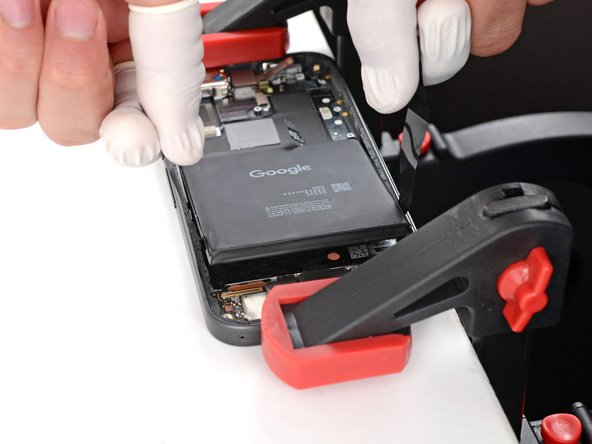
  • Pull straight up on the battery pull tabs and apply constant, steady pressure until the battery separates from the frame.

  • If the battery doesn't separate after one minute of steady pressure, apply more heat and try again.

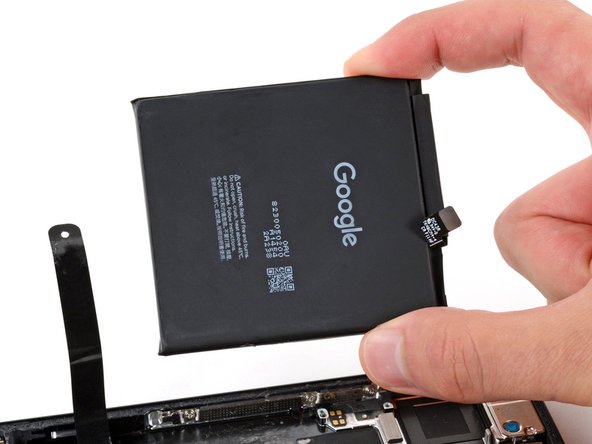
  • Remove the battery.

  • Never reuse a deformed or damaged battery—it's a fire hazard. Replace it with a new battery.

  • If you successfully removed the battery, congratulations! Skip down seven steps for reassembly information.

  • If the pull tab broke or accidentally slipped out from under the battery, don't worry! Go to the next step for an alternate battery removal method.

Tira hacia arriba de las pestañas de la batería y aplica una presión constante hasta que la batería se separe del marco.

Si la batería no se separa tras un minuto de presión constante, aplica más calor e inténtalo de nuevo.

Retira la batería.

Nunca reutilices una batería deformada o dañada: es un peligro de incendio. Sustitúyela por una batería nueva.

Si has sacado la batería con éxito, ¡enhorabuena! Omite los siete pasos siguientes para obtener información sobre el reensamblaje.

Si la pestaña se ha roto o se ha salido accidentalmente de debajo de la batería, ¡no te preocupes! Ve al paso siguiente para ver un método alternativo de extracción de la batería.

crwdns2944171:0crwdnd2944171:0crwdnd2944171:0crwdnd2944171:0crwdne2944171:0