crwdns2933423:0crwdne2933423:0

Bildschirmtausch beim Microsoft Surface Pro 11

crwdns2931529:0crwdnd2931529:0crwdnd2931529:0crwdnd2931529:09crwdnd2931529:0crwdne2931529:0

crwdns2936315:0crwdne2936315:0
crwdns2936319:0crwdne2936319:0
crwdns2931653:03crwdne2931653:0
Microsoft Surface Pro 11 Screen Replacement, Separate the right edge adhesive: crwdns2935265:00crwdnd2935265:01crwdnd2935265:03crwdne2935265:0 Microsoft Surface Pro 11 Screen Replacement, Separate the right edge adhesive: crwdns2935265:00crwdnd2935265:02crwdnd2935265:03crwdne2935265:0 Microsoft Surface Pro 11 Screen Replacement, Separate the right edge adhesive: crwdns2935265:00crwdnd2935265:03crwdnd2935265:03crwdne2935265:0
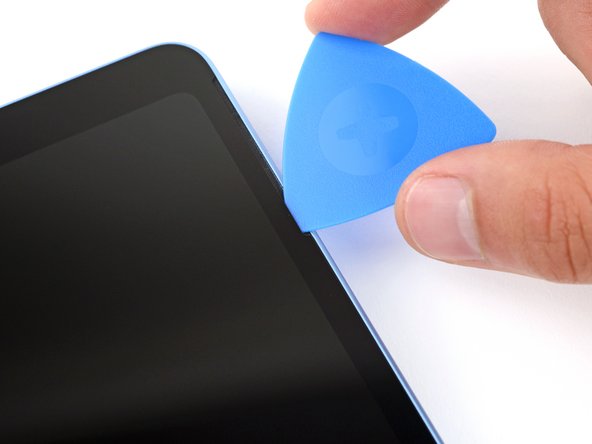
Separate the right edge adhesive
  • Remember not to insert your pick more than 2 mm on the right edge.

  • Insert the tip of an opening pick under the screen near the bottom of the right speaker cutout.

  • Slide your pick towards the bottom edge and slightly rotate it so the tip goes under the notch in the screen.

Denke daran, dein Plektrum nicht mehr als 2mm in die Kante zu schieben.

Führe die Spitze eines Öffnungsplektrum, in der Nähe der unteren Aussparung des rechten Lautsprechers, unter dem Bildschirm, ein.

Schiebe dein Plektrum in Richtung der unteren Kante und drehe es leicht, damit die Spitze unter die Einkerbung des Bildschirms gelangt.

crwdns2944171:0crwdnd2944171:0crwdnd2944171:0crwdnd2944171:0crwdne2944171:0