crwdns2933423:0crwdne2933423:0

Microsoft Surface Laptop 7 (13.8インチ) スクリーンの交換

crwdns2935425:015crwdne2935425:0

crwdns2936315:0crwdne2936315:0
crwdns2936323:0crwdne2936323:0
crwdns2931653:015crwdne2931653:0
Microsoft Surface Laptop 7 (13.8-inch) Screen Replacement, Remove the screen: crwdns2935265:00crwdnd2935265:01crwdnd2935265:03crwdne2935265:0 Microsoft Surface Laptop 7 (13.8-inch) Screen Replacement, Remove the screen: crwdns2935265:00crwdnd2935265:02crwdnd2935265:03crwdne2935265:0 Microsoft Surface Laptop 7 (13.8-inch) Screen Replacement, Remove the screen: crwdns2935265:00crwdnd2935265:03crwdnd2935265:03crwdne2935265:0
Remove the screen
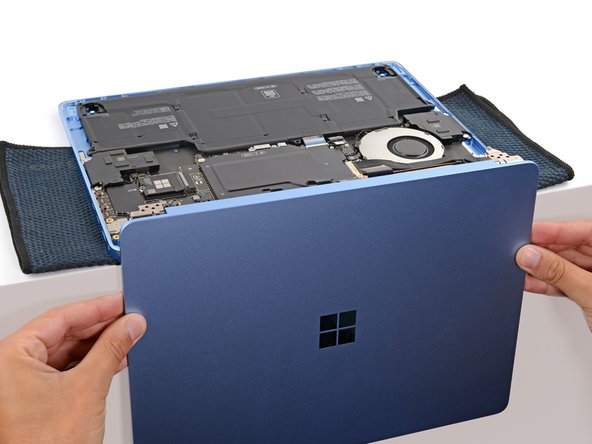
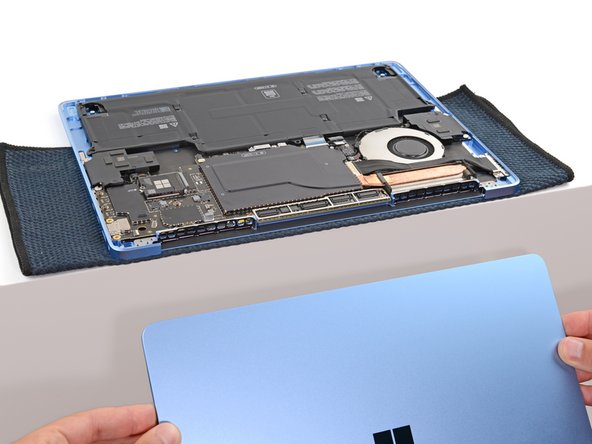
  • Hold the screen with both hands and lift the hinges out of their recesses to remove the screen.

  • During reassembly:

  • Make sure the screen hinges are open 90 degrees and guide them into their recesses in the frame.

  • Install and partially tighten the seven hinge screws.

  • Close your laptop and make sure the screen is properly aligned. If it clicks or snaps, readjust the alignment.

  • Fully tighten the hinge screws.

両手でスクリーンを持ち、ヒンジをそれぞれのくぼみから持ち上げて、スクリーンを取り外します。

再組み立ての際、

スクリーンのヒンジが90度開いていることを確認し、フレームのくぼみに位置を合わせてください。

7本のヒンジネジを取り付け、仮締めします。

ノートパソコンを閉じ、スクリーンが正しく位置合わせされていることを確認してください。カチッという音がしたり、はまる感触があったりする場合は、位置合わせを調整してください。

ヒンジのネジをしっかりと締めます。

crwdns2944171:0crwdnd2944171:0crwdnd2944171:0crwdnd2944171:0crwdne2944171:0