crwdns2933423:0crwdne2933423:0

Desmontaje del cartucho del motor del alimentador de mascotas Surepet Surefeed Microchip

crwdns2936315:0crwdne2936315:0
crwdns2936331:0crwdne2936331:0
crwdns2931653:05crwdne2931653:0
Disassembling Surepet Surefeed Microchip Pet Feeder Motor cartridge, Tighten the set screw on the motor: crwdns2935265:00crwdnd2935265:01crwdnd2935265:03crwdne2935265:0 Disassembling Surepet Surefeed Microchip Pet Feeder Motor cartridge, Tighten the set screw on the motor: crwdns2935265:00crwdnd2935265:02crwdnd2935265:03crwdne2935265:0 Disassembling Surepet Surefeed Microchip Pet Feeder Motor cartridge, Tighten the set screw on the motor: crwdns2935265:00crwdnd2935265:03crwdnd2935265:03crwdne2935265:0
Tighten the set screw on the motor
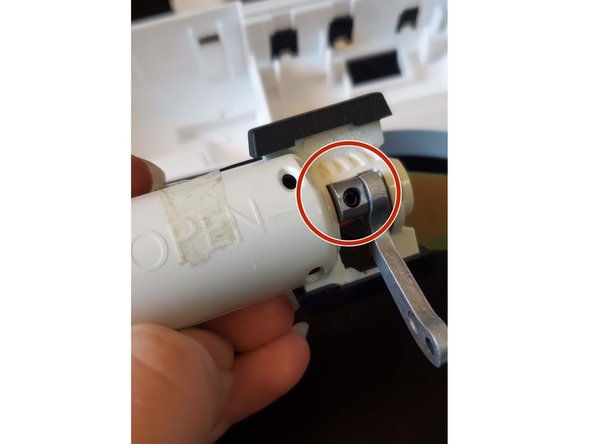
  • The motor and daughter circuit board should pull right out. Find the set screw holding the lid mechanism linkage to the motor (second photo). If your motor wasn't opening the lid or making a clicking sound, this has probably come loose.

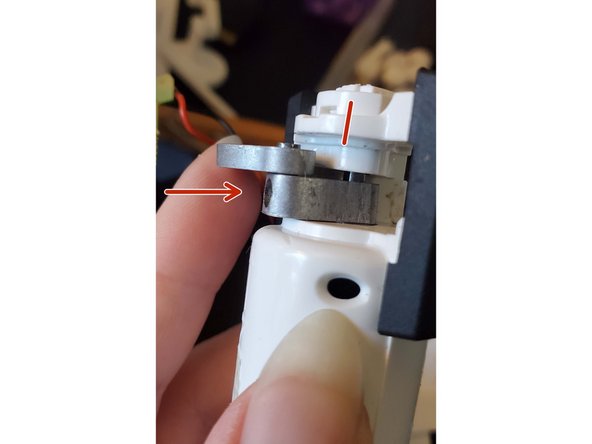
  • The shaft of the motor is a D shape, and the set screw needs to be tightened on the flat side - the line in the third photo. is parallel to the desired flat side, and the arrow shows the direction the set screw should be.

  • At this point, you may need to power the motor and allow the motor to rotate so the flat side can be lined up with the set screw. On the main unit, screw the battery housing back on (undo the step at 1:11 on Surepet's video), insert batteries, and connect the ribbon cable, paying attention to the direction of the connector clip.

  • Press the open/close button on the daughter circuit board so the motor attempts to move the lid. Then pull one of the batteries out when the shaft is aligned as seen in the third image.

  • Be very careful not to touch any circuit boards with metal tools or dirty hands, or to cross any wires when you do this (it's ok to interact with the smaller circuit board to press the open/close button). Once you've gotten the shaft aligned, the set screw tightened, and tested that the motor works as intended, take the batteries out.

El motor y la placa de circuito auxiliar deberían salir fácilmente. Localice el tornillo de fijación que sujeta la conexión del mecanismo de la tapa al motor (segunda foto). Si el motor no abría la tapa ni hacía un clic, probablemente se haya soltado.

El eje del motor tiene forma de D y el tornillo de fijación debe ajustarse en el lado plano: la línea en la tercera foto es paralela al lado plano deseado y la flecha muestra la dirección en la que debe estar el tornillo de fijación.

En este punto, puede que necesite encender el motor y dejar que gire para que el lado plano quede alineado con el tornillo de fijación.

En la unidad principal, vuelva a atornillar la carcasa de la batería (repita el paso del minuto 1:11 del video de Surepet), inserte las baterías y conecte el cable plano, prestando atención a la dirección del clip del conector.

Presione el botón de apertura/cierre en la placa de circuito auxiliar para que el motor intente mover la tapa. Luego, extraiga una de las baterías cuando el eje esté alineado, como se muestra en la tercera imagen.

Tenga mucho cuidado de no tocar ninguna placa de circuito con herramientas metálicas ni con las manos sucias, ni de cruzar ningún cable al hacer esto (puede tocar la placa de circuito más pequeña para presionar el botón de apertura/cierre).

Una vez alineado el eje, apretado el tornillo de fijación y comprobado el correcto funcionamiento del motor, retire las baterías.

crwdns2944171:0crwdnd2944171:0crwdnd2944171:0crwdnd2944171:0crwdne2944171:0