crwdns2933423:0crwdne2933423:0

Rimozione scheda madre e altoparlante auricolare (Pro)

crwdns2931529:0crwdnd2931529:0crwdnd2931529:0crwdnd2931529:02crwdnd2931529:0crwdne2931529:0

crwdns2936315:0crwdne2936315:0
crwdns2936321:0crwdne2936321:0
crwdns2931653:07crwdne2931653:0
Motherboard and Earpiece Speaker Removal (Pro), Reassembly information: crwdns2935265:00crwdnd2935265:01crwdnd2935265:03crwdne2935265:0 Motherboard and Earpiece Speaker Removal (Pro), Reassembly information: crwdns2935265:00crwdnd2935265:02crwdnd2935265:03crwdne2935265:0 Motherboard and Earpiece Speaker Removal (Pro), Reassembly information: crwdns2935265:00crwdnd2935265:03crwdnd2935265:03crwdne2935265:0
Reassembly information
  • During reassembly:

  • Use the flat end of a spudger to scrape off any large chunks of thermal paste from the bottom of the motherboard.

  • Use a pipette or syringe to apply a drop of isopropyl alcohol (>90%) to the thermal paste residue.

  • Wipe away all the residue with a coffee filter or lint-free cloth. Wait one minute to allow the alcohol to completely dry.

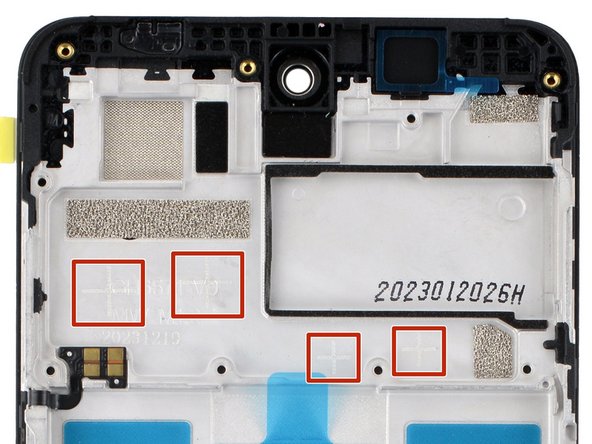
  • Apply a small bead of thermal paste to each of the four plus (+) signs that are lightly engraved in the frame.

Durante il rimontaggio:

Usa la parte piatta di uno spudger per grattare via i pezzi di pasta termica più grandi dalla parte inferiore della scheda madre.

Usa una pipetta o una siringa per applicare una goccia di alcool isopropilico (>90%) al residuo di pasta termica.

Pulisci tutto il residuo con un filtro da caffè o un panno senza lanugine. Aspetta un minuto per lasciare che l'alcool si asciughi completamente.

Applica una piccola goccia di pasta termica su ciascuno dei quattro segni più (+) che sono leggermente incisi sul telaio.

crwdns2944171:0crwdnd2944171:0crwdnd2944171:0crwdnd2944171:0crwdne2944171:0