crwdns2933423:0crwdne2933423:0

Motherboard und Ohrhörer-Lautsprecher ausbauen (Pro)

crwdns2931529:0crwdnd2931529:0crwdnd2931529:0crwdnd2931529:02crwdnd2931529:0crwdne2931529:0

crwdns2936315:0crwdne2936315:0
crwdns2936319:0crwdne2936319:0
crwdns2931653:07crwdne2931653:0
Motherboard and Earpiece Speaker Removal (Pro), Reassembly information: crwdns2935265:00crwdnd2935265:01crwdnd2935265:03crwdne2935265:0 Motherboard and Earpiece Speaker Removal (Pro), Reassembly information: crwdns2935265:00crwdnd2935265:02crwdnd2935265:03crwdne2935265:0 Motherboard and Earpiece Speaker Removal (Pro), Reassembly information: crwdns2935265:00crwdnd2935265:03crwdnd2935265:03crwdne2935265:0
Reassembly information
  • During reassembly:

  • Use the flat end of a spudger to scrape off any large chunks of thermal paste from the bottom of the motherboard.

  • Use a pipette or syringe to apply a drop of isopropyl alcohol (>90%) to the thermal paste residue.

  • Wipe away all the residue with a coffee filter or lint-free cloth. Wait one minute to allow the alcohol to completely dry.

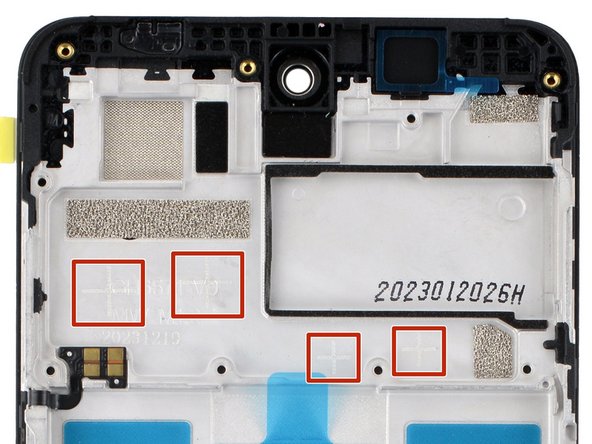
  • Apply a small bead of thermal paste to each of the four plus (+) signs that are lightly engraved in the frame.

Achte beim Wiederzusammenbau auf folgende Punkte:

Benutze das flache Ende eines Spudgers, um große Stücke der Wärmeleitpaste von der Unterseite des Motherboards abzukratzen.

Benutze eine Pipette oder eine Spritze, um einen Tropfen Isopropylalkohol (>90%) auf die Rückstände der Wärmeleitpaste aufzutragen.

Wische alle Rückstände mit einem Kaffeefilter oder einem fusselfreien Tuch ab. Warte eine Minute, damit der Alkohol vollständig trocknen kann.

Trage eine kleine Menge Wärmeleitpaste auf jedes der vier Pluszeichen (+) auf, die leicht in den Rahmen eingraviert sind.

crwdns2944171:0crwdnd2944171:0crwdnd2944171:0crwdnd2944171:0crwdne2944171:0