crwdns2933423:0crwdne2933423:0

上部シールドプレートの取り外し

crwdns2931529:0crwdnd2931529:0crwdnd2931529:0crwdnd2931529:02crwdnd2931529:0crwdne2931529:0

crwdns2935425:01crwdne2935425:0

crwdns2936315:0crwdne2936315:0
crwdns2936323:0crwdne2936323:0
crwdns2931653:01crwdne2931653:0
Top Shield Plate Removal, Remove the disc drive: crwdns2935265:00crwdnd2935265:01crwdnd2935265:03crwdne2935265:0 Top Shield Plate Removal, Remove the disc drive: crwdns2935265:00crwdnd2935265:02crwdnd2935265:03crwdne2935265:0 Top Shield Plate Removal, Remove the disc drive: crwdns2935265:00crwdnd2935265:03crwdnd2935265:03crwdne2935265:0
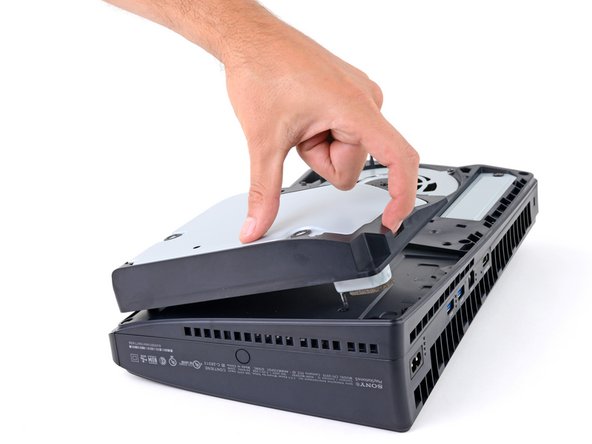
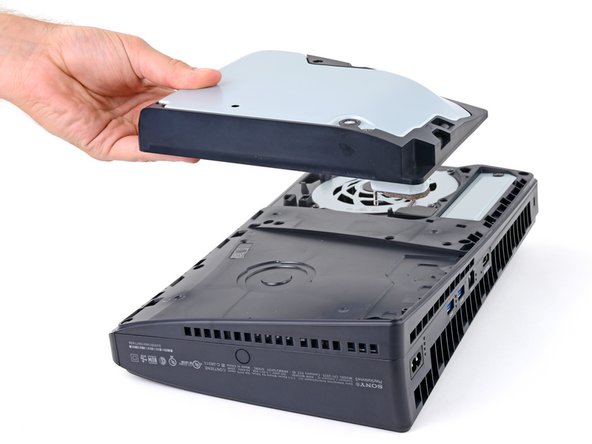
Remove the disc drive
  • If your PlayStation doesn't have a disc drive, skip this step.

  • Use the cutout on the bottom right corner of the disc drive to lift its right edge and disconnect it.

  • Remove the disc drive.

  • During reassembly, place the hooks on the left edge of the drive into their cutouts and firmly press the drive into place so the connector on the bottom right corner goes into its socket.

PlayStation にディスク ドライブがない場合は、この手順をスキップしてください。

ディスク ドライブの右下隅の切り欠きを使用して、右端を持ち上げて取り外します。

ディスク ドライブを取り外します。

再組み立て中に、ドライブの左端のフックを切り欠きに差し込み、ドライブをしっかりと押し込んで、右下隅のコネクタがソケットに収まるようにします。

crwdns2944171:0crwdnd2944171:0crwdnd2944171:0crwdnd2944171:0crwdne2944171:0