crwdns2933423:0crwdne2933423:0

Austausch der USB-C-Ladebuchse beim Asus Zenfone 9

crwdns2935425:07crwdne2935425:0

crwdns2936315:0crwdne2936315:0
crwdns2936319:0crwdne2936319:0
crwdns2931653:07crwdne2931653:0
Asus Zenfone 9 USB-C Charging Port Replacement, Replace the USB-C cable and port: crwdns2935265:00crwdnd2935265:01crwdnd2935265:03crwdne2935265:0 Asus Zenfone 9 USB-C Charging Port Replacement, Replace the USB-C cable and port: crwdns2935265:00crwdnd2935265:02crwdnd2935265:03crwdne2935265:0 Asus Zenfone 9 USB-C Charging Port Replacement, Replace the USB-C cable and port: crwdns2935265:00crwdnd2935265:03crwdnd2935265:03crwdne2935265:0
Replace the USB-C cable and port
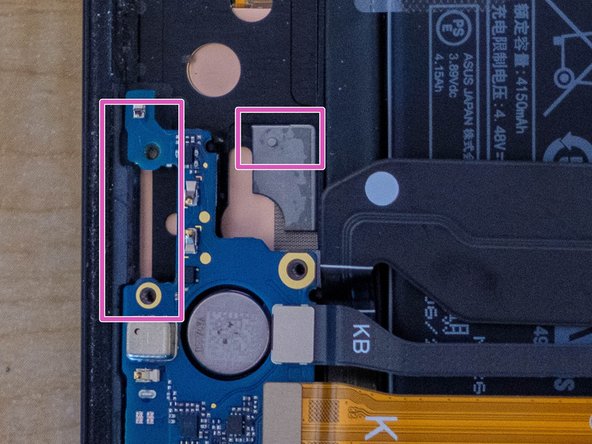
  • Remove the blue plastic covering the adhesive on the new cable.

  • Align the cable so the side marked "KB" is up and toward the bottom of the phone.

  • Insert the new port where the old one was.

  • The red gasket seals the connection, so it will be tight.

  • The cable is keyed to the gray plastic peg highlighted in the second photo.

  • Make sure the screw holes in the new port align perfectly with the circuit board.

  • Press the cable down over the plastic peg which will attach the adhesive.

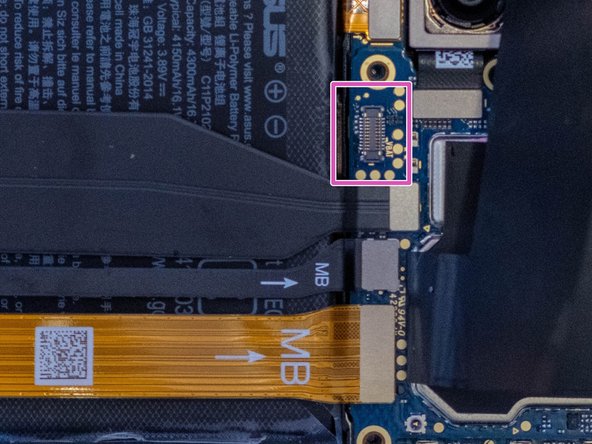
  • Reconnect the "MB" side of the cable to the highlighted port on the main board.

Entferne die blaue Abdeckung, die den Kleber auf dem neuen Kabel bedeckt.

Richte das Kabel so aus, dass die mit "KB" markierte Seite nach oben in Richtung Unterseite des Handys ausgerichtet ist.

Baue den neuen Anschluss da ein, wo der alte war.

Die rote Dichtung versiegelt die Verbindung, also sitzt sie sehr eng.

Das Kabel sollte auf dem grauen Plastik liegen, was im zweiten Bild markiert ist.

Achte darauf, dass die Schraublöcher des neuen Anschlusses perfekt mit denen auf der Platine fluchten.

Drücke das Kabel nach unten und das graue Plastik wird sich mit dem Kleber auf dem Kabel verbinden.

Verbinde die "MB"-Seite des Kabels mit dem markierten Anschluss auf dem Mainboard.

crwdns2944171:0crwdnd2944171:0crwdnd2944171:0crwdnd2944171:0crwdne2944171:0