crwdns2933423:0crwdne2933423:0

Asus ROG Ally Hauptplatine ausbauen

crwdns2931529:0crwdnd2931529:0crwdnd2931529:0crwdnd2931529:04crwdnd2931529:0crwdne2931529:0

crwdns2935425:017crwdne2935425:0

crwdns2936315:0crwdne2936315:0
crwdns2936319:0crwdne2936319:0
crwdns2931653:017crwdne2931653:0
Asus ROG Ally Motherboard Removal, Remove the motherboard: crwdns2935265:00crwdnd2935265:01crwdnd2935265:03crwdne2935265:0 Asus ROG Ally Motherboard Removal, Remove the motherboard: crwdns2935265:00crwdnd2935265:02crwdnd2935265:03crwdne2935265:0 Asus ROG Ally Motherboard Removal, Remove the motherboard: crwdns2935265:00crwdnd2935265:03crwdnd2935265:03crwdne2935265:0
Remove the motherboard
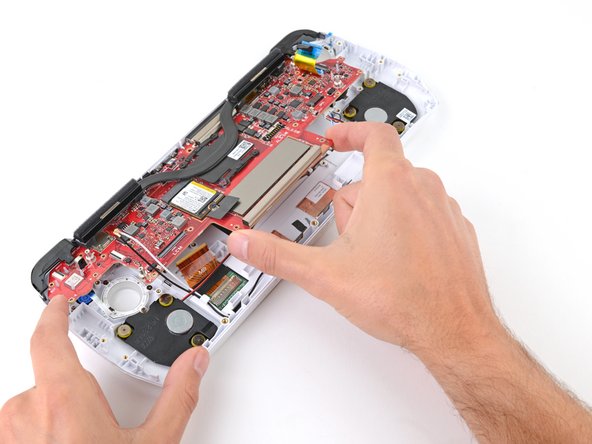
  • If you have a microSD card installed, make sure to remove it before continuing.

  • With one hand, firmly secure your device.

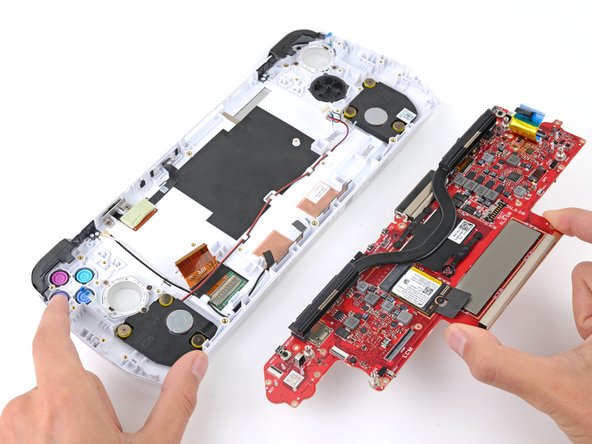
  • With your free hand, lift the bottom edge of the motherboard and pull it towards the bottom of the chassis to remove it.

  • During reassembly:

  • With one hand, lift the top edge of your device so the actions buttons and D-Pad aren't touching your work surface.

  • Visually check that all the buttons are fully and properly in their recesses. If they aren't, they won't press correctly.

  • With your device lifted, use your free hand to slide the motherboard into place at a slight downward angle.

  • Make sure the bumper buttons near the upper corners go under the plastic bumpers and the ports along the top edge go into their cutouts.

Wenn du eine microSD-Karte eingebaut hast, musst du sie entfernen.

Halte das Gerät mit einer Hand gut fest.

Hebe die Hauptplatine mit der freien Hand an der Unterkante an und ziehe sie am Rahmen nach unten. Entferne sie dann.

Beim Zusammenbau:

Hebe das Gerät an der Oberkante an, so dass die Aktionstasten und das Schiebepad die Arbeitsfläche nicht berühren.

Kontrolliere nochmals, ob die Tasten ganz und richtig in ihren Öffnungen sitzen. Wenn dies nicht der Fall ist, lösen sie nicht richtig aus.

Halte das Gerät weiter hoch und schiebe die Hauptplatine mit der freien Hand schräg geneigt an ihren Platz.

Achte darauf , dass die Tasten bei den oberen Ecken unter die Kunstoffpuffer gehen und die Anschlüsse an der Oberkante in ihren Ausschnitten sind.

crwdns2944171:0crwdnd2944171:0crwdnd2944171:0crwdnd2944171:0crwdne2944171:0