crwdns2933423:0crwdne2933423:0

Extracción del parachoques izquierdo de la Steam Deck OLED

crwdns2931529:0crwdnd2931529:0crwdnd2931529:0crwdnd2931529:05crwdnd2931529:0crwdne2931529:0

crwdns2935425:01crwdne2935425:0

crwdns2936315:0crwdne2936315:0
crwdns2936331:0crwdne2936331:0
crwdns2931653:01crwdne2931653:0
Steam Deck OLED Left Bumper Removal, Remove the left trigger: crwdns2935265:00crwdnd2935265:01crwdnd2935265:03crwdne2935265:0 Steam Deck OLED Left Bumper Removal, Remove the left trigger: crwdns2935265:00crwdnd2935265:02crwdnd2935265:03crwdne2935265:0 Steam Deck OLED Left Bumper Removal, Remove the left trigger: crwdns2935265:00crwdnd2935265:03crwdnd2935265:03crwdne2935265:0
Remove the left trigger
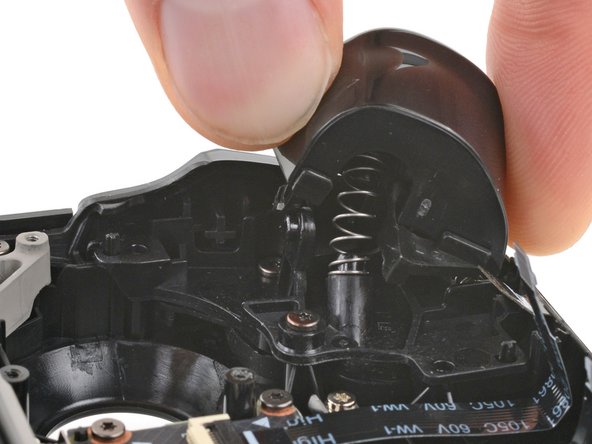
  • The left trigger is on your right-hand side when working on the Steam Deck OLED, as it's laying upside down.

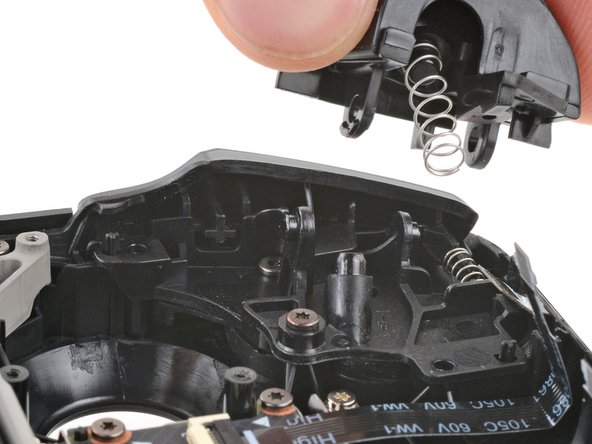
  • The trigger clips into place on two pegs on the frame, which double as the hinge.

  • Place the flat end of a spudger onto the inside edge of the trigger's left clip.

  • Use your fingers to push the trigger toward the left as you wedge the spudger between the clip and the peg.

  • Use your spudger to pivot the trigger clip out, away, and up from the peg to unlatch it.

  • During reassembly, latch the right peg first. Once in place, push down on the trigger to latch the left peg, producing an audible "click" sound.

  • Check to make sure that the trigger spring is properly aligned. Test the trigger action before continuing reassembly.

El gatillo izquierdo está en el lado derecho cuando se trabaja en el Steam Deck OLED, ya que está boca abajo.

El gatillo se encaja en dos clavijas del marco, que también funcionan como bisagra.

Coloque el extremo plano de un spudger en el borde interior del clip izquierdo del gatillo.

Utilice los dedos para empujar el gatillo hacia la izquierda mientras coloca el spudger entre el clip y la clavija.

Utilice su spudger para girar el clip del gatillo hacia afuera, lejos y hacia arriba desde la clavija para desengancharlo.

Durante el reensamblaje, primero bloquee la clavija derecha. Una vez colocada, presione el gatillo para bloquear la clavija izquierda, oyendo un clic.

Compruebe que el resorte del gatillo esté correctamente alineado. Pruebe el mecanismo del gatillo antes de continuar con el montaje.

crwdns2944171:0crwdnd2944171:0crwdnd2944171:0crwdnd2944171:0crwdne2944171:0