crwdns2931529:0crwdnd2931529:0crwdnd2931529:0crwdnd2931529:06crwdnd2931529:0crwdne2931529:0
crwdns2935425:024crwdne2935425:0
crwdns2931653:024crwdne2931653:0


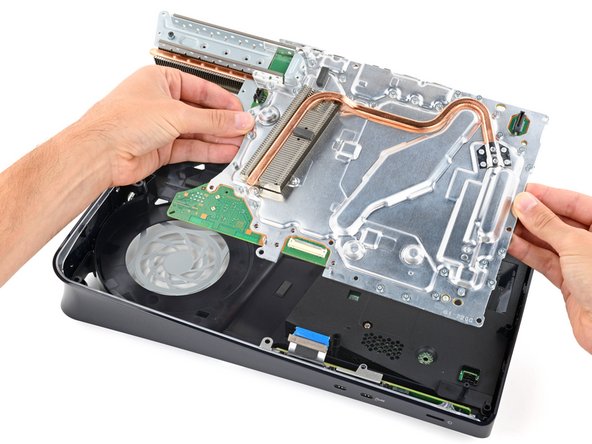


Remove the main board assembly
-
Firmly secure the plastic housing with one hand.
-
With your free hand, grab the upper edge of the main board assembly and lift it out of the plastic housing.
-
Lower the assembly into its recess so its prongs go into their socket on the power supply and the three cutouts go over their alignment posts.
| [title] Remove the main board assembly | |
| - | [* icon_caution] Do ***not*** grab the main board assembly by the [link|https://guide-images.cdn.ifixit.com/igi/cSktoTFVoeDKHLsr.full|heat pipes or its fins|new_window=true], as they can easily be damaged. |
| + | [* icon_caution] Do ***not*** grab the main board assembly by the [link|https://guide-images.cdn.ifixit.com/igi/cSktoTFVoeDKHLsr.full|copper heat pipes or its fins|new_window=true], as they can easily be damaged. |
| [* black] Firmly secure the plastic housing with one hand. | |
| [* black] With your free hand, grab the upper edge of the main board assembly and lift it out of the plastic housing. | |
| [* icon_reminder] During reassembly: | |
| [* icon_note] Make sure the interconnect cable doesn't get stuck under the main board assembly when lowering it into place. | |
| [* black] Lower the assembly into its recess so its [link|https://guide-images.cdn.ifixit.com/igi/QhW1NHXheRXNMGKG.full|prongs go into their socket on the power supply|new_window=true] and the three cutouts [link|https://guide-images.cdn.ifixit.com/igi/2qxtaAMTmxlQNVL6.full|go over their alignment posts|new_window=true]. |
crwdns2944171:0crwdnd2944171:0crwdnd2944171:0crwdnd2944171:0crwdne2944171:0