crwdns2933423:0crwdne2933423:0

Reemplazo de la carcasa inferior de la MacBook Pro de 14" (finales de 2023, M3)

crwdns2931529:0crwdnd2931529:0crwdnd2931529:0crwdnd2931529:011crwdnd2931529:0crwdne2931529:0

crwdns2935425:05crwdne2935425:0

crwdns2936315:0crwdne2936315:0
crwdns2936331:0crwdne2936331:0
crwdns2931653:05crwdne2931653:0
MacBook Pro 14" Late 2023 (M3) Lower Case Replacement, Remove the lower case: crwdns2935265:00crwdnd2935265:01crwdnd2935265:03crwdne2935265:0 MacBook Pro 14" Late 2023 (M3) Lower Case Replacement, Remove the lower case: crwdns2935265:00crwdnd2935265:02crwdnd2935265:03crwdne2935265:0 MacBook Pro 14" Late 2023 (M3) Lower Case Replacement, Remove the lower case: crwdns2935265:00crwdnd2935265:03crwdnd2935265:03crwdne2935265:0
Remove the lower case
  • Remove the lower case.

  • To reinstall the lower case:

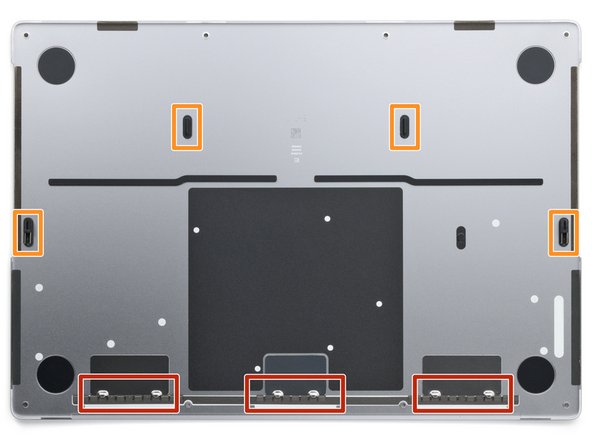
  • Lay it down and align the sliding clips with the back edge of the MacBook. Press down on the lower case and slide it toward the back edge to engage the clips.

  • When one side is engaged, it may push the other out of alignment. Check both sides as you push.

  • Once the back corners of the lower case are secured and flush with the frame, press down along the middle of the lower case to engage the four remaining clips.

  • You'll hear and feel each clip snap into place.

Retire la carcasa inferior.

Para reinstalar la carcasa inferior:

Colóquela y alinee los clips deslizantes con el borde posterior de la MacBook. Presione la carcasa inferior y deslícela hacia el borde posterior para enganchar los clips.

Al encajar un lado, el otro podría desalinearse. Revise ambos lados al empujar.

Una vez que las esquinas traseras de la caja inferior estén aseguradas y al ras con el marco, presione hacia abajo a lo largo del medio de la caja inferior para enganchar los cuatro clips restantes.

Oirás y sentirás cómo cada clip encaja en su lugar.

crwdns2944171:0crwdnd2944171:0crwdnd2944171:0crwdnd2944171:0crwdne2944171:0