crwdns2933423:0crwdne2933423:0

Sony SRS-XB13 Microphone Replacement

crwdns2931529:0crwdnd2931529:0crwdnd2931529:0crwdnd2931529:03crwdnd2931529:0crwdne2931529:0

crwdns2935425:04crwdne2935425:0

crwdns2936315:0crwdne2936315:0
crwdns2936321:0crwdne2936321:0
crwdns2931653:04crwdne2931653:0
Sony SRS-XB13 Microphone Replacement: crwdns2935265:00crwdnd2935265:01crwdnd2935265:03crwdne2935265:0 Sony SRS-XB13 Microphone Replacement: crwdns2935265:00crwdnd2935265:02crwdnd2935265:03crwdne2935265:0 Sony SRS-XB13 Microphone Replacement: crwdns2935265:00crwdnd2935265:03crwdnd2935265:03crwdne2935265:0
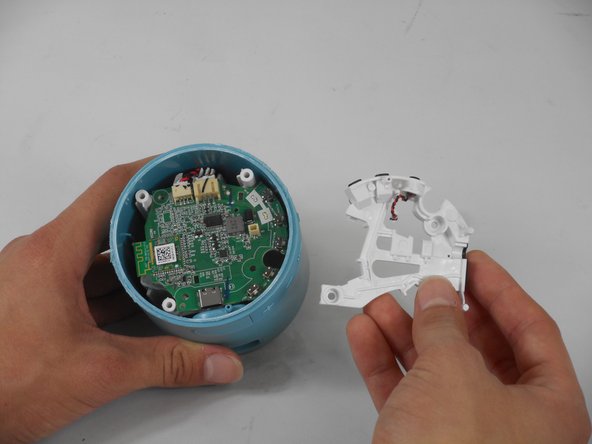
  • Place one end of the ifixit opening tool underneath the white bracket that sits above the motherboard, so that it latches onto the bottom side of the bracket.

  • With the opposite end of the tool, apply a gentle but firm downward motion to slowly pry the bracket from its position.

  • The microphone is embedded within the white bracket, so to replace the microphone, you must replace the bracket.

  • Once enough separation has occurred between the bracket and the motherboard, you can use your fingers to finish fully prying the bracket from its position.

  • The bracket has multiple edges that can be latched onto with the opening tool. It is recommended to use the opening tool in a counterclockwise pattern around the bracket. This helps prevent damaging the bracket, and smoothly releases it from its position.

crwdns2935429:0crwdne2935429:0

crwdns2935429:0crwdne2935429:0

crwdns2935429:0crwdne2935429:0

crwdns2935429:0crwdne2935429:0

crwdns2935429:0crwdne2935429:0

crwdns2944171:0crwdnd2944171:0crwdnd2944171:0crwdnd2944171:0crwdne2944171:0